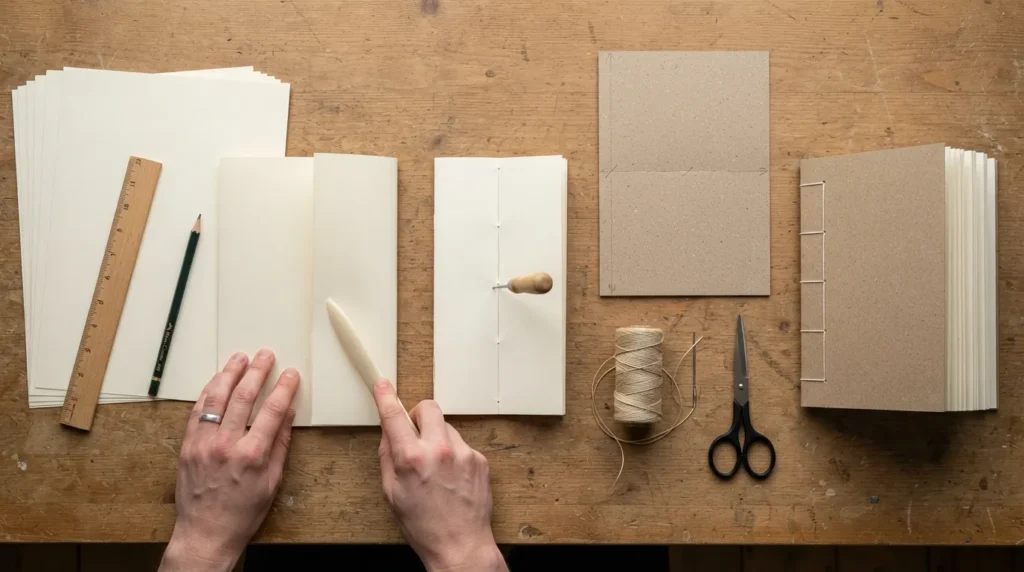
If you want to create a journal from scratch, you don’t need a bookbinding studio or expensive supplies. With paper, a simple cover, a needle and thread, you can make a useful handmade journal in an afternoon. The easiest beginner method is to fold your pages into small groups called signatures, place them inside a folded cover, and sew everything together with a simple three-hole pamphlet stitch.
I’ll show you exactly how to make one, how to choose the right paper and size, how to bind it without complicated equipment, and a few easy ways to customize it with pockets, mixed paper, or a different binding method.
The simplest method: fold your paper in half, group the folded sheets into signatures, make three holes along the center crease, and sew the pages to a folded cardstock cover with a pamphlet stitch.
What You Need to Make a Journal
You can make a journal from surprisingly ordinary materials. Printer paper, recycled paper, graph paper, ruled paper, watercolor paper, or even suitable scraps can work. A thicker piece of cardstock makes a simple cover, while a folder or thin cardboard can also be reused.
- 10–20 sheets of paper for a small beginner journal
- Cardstock or thin cardboard for the cover
- Sharp needle large enough for your thread
- Strong thread, embroidery floss, or waxed thread
- Scissors
- Ruler and pencil for measuring and marking
- Glue, if you want to add decorative elements or use an alternative binding method
You don’t have to use exactly these materials. One of the advantages of making your own journal is that you can mix paper types and choose the size and cover material that suit you. The Brooklyn Refinery, for example, notes that handmade journals can use plain, graph, watercolor, rag, copy, ruled, recycled, and other papers. :contentReference[oaicite:0]{index=0}
Choose Your Journal Size and Paper
Before cutting anything, decide how you want the finished journal to feel. A larger journal gives you more writing space, while a smaller one is easier to carry.
Paper choice | Good for | What to consider |
Plain or printer paper | Everyday writing | Easy to fold and inexpensive |
Ruled paper | Traditional diary writing | Already gives you writing guides |
Grid paper | Planning, diagrams, sketches | Useful if you want structure without ruled lines |
Watercolor or drawing paper | Art journals and mixed-media pages | Thicker paper makes a heavier journal |
Recycled or mixed paper | Creative and travel journals | Different sizes and textures create a handmade feel |
If you’re making your first journal, ordinary printer paper is the easiest place to start. Once you understand the folding and binding process, you can experiment with heavier or mixed papers
How to Create a Journal Step by Step
1. Decide the finished size
Choose the approximate size you want before folding your pages. If you’re starting with standard letter-size paper, folding it in half gives you a compact book format. You can also trim the sheets before or after folding if you want a different proportion.
The cover should be slightly larger than the finished page block so that the pages sit comfortably inside it. Don’t make the cover dramatically larger; a small allowance around the pages is enough for a neat handmade result.
2. Fold the pages in half
Take each sheet and fold it carefully in half. Try to align the edges before pressing the crease. A ruler or bone folder can help you create a cleaner fold, but you can also use the back of a spoon or your fingernail if you’re working with ordinary paper.
If your pages will be used for writing, make sure the fold is crisp and consistent. Uneven folds make the finished journal harder to align.
3. Make the signatures
A signature is a small group of folded sheets nested together to form one booklet. Instead of sewing every individual sheet separately, you bind these small groups as part of the journal.
For a simple beginner journal, group roughly four to five folded sheets together. You can make several signatures if you want a thicker journal. The exact number depends on the paper thickness and how bulky you want the finished book to be.
Beginner tip: Don’t make each signature excessively thick. A smaller group of folded sheets is easier to fold, align, pierce, and sew neatly.
4. Make the cover
Cut a piece of cardstock, scrapbook paper backed with something sturdier, or thin cardboard so it can wrap around your page block. Fold it in half along the same center line as your pages.
If you want a stronger cover, you can reuse an old file folder, cereal box cardboard, or another clean piece of thin packaging board. Cover it with decorative paper or fabric if you want a more finished appearance.
The cover is also where you can personalize the journal. Add a title, fabric, paper collage, a favorite pattern, or a simple color scheme before you bind everything together.
5. Align the signatures inside the cover
Nest your signatures together and place them inside the folded cover. Tap the edges gently against a flat surface so the pages line up.
This step is worth taking slowly. If the pages are uneven before you make the holes, the finished journal will usually stay uneven after sewing.
6. Mark three holes along the crease
For a basic pamphlet stitch, mark three points along the center crease: one near the upper portion, one in the middle, and one near the lower portion. Keep the marks aligned through the signatures and cover.
You can use a sharp needle to pierce the holes, although an awl makes the job easier when the paper or cover is thick. Work on a surface that you don’t mind marking, and keep your fingers away from the path of the needle.
7. Sew the journal with a simple pamphlet stitch
Thread your needle with a strong piece of thread. Starting from the inside middle hole, pass the thread through the center, then through one of the outer holes, and back through the remaining outer hole. Finish by returning through the center and tying the ends securely.
The exact path matters less than keeping the thread snug without pulling so hard that it tears the paper. The goal is a firm binding that still allows the journal to open naturally.
Food52’s hand-stitched journal tutorial also demonstrates a simple three-hole pamphlet-style binding, while the AI Overview for this query currently emphasizes the same basic fold, hole-punching, and stitching sequence. :contentReference[oaicite:1]{index=1}
8. Tie off and flatten the journal
Trim loose thread ends after tying the binding. Close the journal and press it gently so the cover and pages settle into their final shape.
If the journal wants to spring open, place it under a heavy book for a while. This can help the folds and cover sit flatter without adding another complicated step to the binding process.
What If You Don't Want to Sew?
Sewing is a good beginner binding method, but it isn’t your only option. The best choice depends on how quickly you want to finish the journal and how much flexibility you want later.
Method | Best when | Main trade-off |
Pamphlet stitch | You want a simple handmade binding | Requires careful hole alignment and sewing |
Staples | You want the quickest small notebook | Limited by the reach of the stapler and page thickness |
Glue | You prefer a no-sew project | The spine needs careful drying and alignment |
Ribbon or cord | You want a decorative, flexible closure | Usually needs holes or another way to secure the pages |
For a first handmade journal, I’d stick with the simple pamphlet stitch if you can sew three holes. It gives you a real book-like result without requiring specialized bookbinding equipment.
Easy Ways to Customize Your Journal
Once the basic journal is assembled, you can make it fit the way you actually plan to use it. Handmade journals don’t have to contain identical pages.
- Add a pocket: Fold a piece of cardstock or decorative paper and attach it inside the front or back cover. You can use it for notes, receipts, photographs, tickets, or loose paper.
- Mix paper types: Combine ruled pages for writing with grid paper for planning and heavier paper for sketches.
- Add a bookmark: Sew or glue a ribbon into the top of the spine before finishing the cover.
- Make a closure: A ribbon, elastic, cord, or simple strap can keep the journal closed.
- Decorate the cover: Use fabric, collage paper, stamps, drawings, or a simple handwritten title.
- Use different page sizes: A travel or memory journal can be more interesting when photographs, notes, and paper scraps are mixed together.
The Brooklyn Refinery specifically highlights mixed papers, different paper sizes, pockets, and handmade covers as advantages of creating your own journal. :contentReference[oaicite:2]{index=2}
How to Make a Pocket in a Journal
A pocket is one of the easiest useful additions to a handmade journal. You can make one from a rectangular piece of cardstock or decorative paper.
- Cut the paper slightly smaller than the inside cover.
- Fold the bottom and side edges inward to create small flaps.
- Glue or sew the side and bottom flaps to the inside cover.
- Leave the top edge open so you can slide items into the pocket.
- Let the adhesive dry completely before filling the pocket.
If you want the pocket to hold thicker items, make it slightly deeper and use stronger cardstock. Don’t make it so deep that it adds unnecessary bulk to the spine.
How to Start Using the Journal You Made
need a complicated system to start writing.
Write the date first. Then describe one thing that happened, what you thought about it, or what you want to remember. If nothing interesting happened, write about what is currently occupying your attention.
A simple first entry could look like this:
“August 20 — I finally made my own journal today. I thought the binding would be difficult, but the three-hole stitch was easier than I expected. I want to use these pages for ideas and things I don’t want to forget.”
You don’t have to fill a certain number of pages or write every day. A simple notebook can become a daily journal, travel journal, sketchbook, memory book, idea journal, or a place for lists and notes.
Common Mistakes When Making a Journal
Using too many pages at once
A very thick signature can become difficult to fold and sew. Start with smaller groups and add more signatures if you want a thicker book.
Skipping alignment
If your signatures aren’t aligned before you make the holes, the pages can shift and the finished journal may look uneven. Tap the edges against a flat surface before marking the spine.
Pulling the thread too tightly
The thread should hold the pages together, not cut through them. If the paper begins to buckle around the holes, loosen the tension slightly.
Making the cover too small
Measure the folded page block before finalizing the cover. The cover should give the pages enough room to sit inside without their edges sticking out.
Decorating before checking the construction
If you’re new to bookmaking, make a plain version first. Once you know the size and binding work, you can decorate the next one with much more confidence.
Can You Use Grid Paper to Make a Journal?
Yes. Grid paper works especially well if you want to combine writing with planning, diagrams, sketches, lists, or habit tracking. You can also mix grid paper with plain or ruled pages instead of making every page identical.
Can You Make a Journal for a School Project?
Absolutely. A handmade journal can work well for school projects because you can control the paper size, cover design, number of pages, and overall appearance. For a project, decide the required page count and dimensions first, then choose your cover and binding method around those requirements.
For example, handmade journal projects have been used to create themed diaries with historical or fictional entries, including school assignments built around a particular period and character. :contentReference[oaicite:3]{index=3}
What Can You Put in a Homemade Journal?
Your journal can be designed around one purpose or several. Some common options include:
- Daily thoughts and events
- Travel memories
- Sketches and drawings
- Poems and creative writing
- Ideas and project notes
- Lists and plans
- Photographs and keepsakes
- Collages and paper ephemera
- Goals and habit tracking
That flexibility is one of the biggest reasons to make your own journal rather than simply buying a ready-made notebook. You can build the pages around what you actually want to do with them.
Frequently Asked Questions
How can I make a journal at home?
Fold sheets of paper in half, group them into signatures, make three holes along the center crease, place them inside a folded cardstock cover, and sew the pages together with a simple pamphlet stitch. You can then add a pocket, bookmark, decoration, or closure.
How many sheets should I put in a journal?
For a beginner project, four to five folded sheets per signature is a manageable starting point. A thicker journal can contain several signatures. The best number depends on your paper thickness and how large you want the finished book to be.
What is a journal signature?
A signature is a small group of folded sheets nested together as one booklet. Multiple signatures can be assembled and bound to create a thicker handmade journal.
What should I write in a journal I made?
Start with whatever you want to remember, understand, plan, or explore. You can write about your day, thoughts, goals, travel, ideas, memories, or creative projects. If you feel stuck, begin with one sentence describing what happened today.
Can I make a journal without sewing?
Yes. You can use staples, glue, ribbon, cord, or another simple binding method. Sewing is useful because it creates a traditional handmade-book appearance, but it isn’t required.
Can I use recycled paper?
Yes, provided the paper is clean and suitable for folding and writing. Recycled paper, old envelopes, brochures, magazine pages, and other paper scraps can add character to a mixed-paper journal. Avoid anything too brittle or heavily coated if you plan to write on it.
Where can I see a visual example of the binding process?
A visual tutorial can make the folding and stitching sequence much easier to understand. You can watch this step-by-step handmade paper journal video for a visual demonstration of the process.
Pimchanok Srisuk
Pimchanok Srisuk is the Journaling Editor at Holistic Wellbeing Living. She writes about journaling prompts, reflective writing, emotional clarity, and mindful routines. With seven years of experience creating personal-growth content, Pimchanok helps readers use simple writing practices to understand their thoughts and make calmer everyday decisions.