Jump to:
ToggleHow to Use a Dotted Journal: The Complete Beginner-to-Advanced Guide
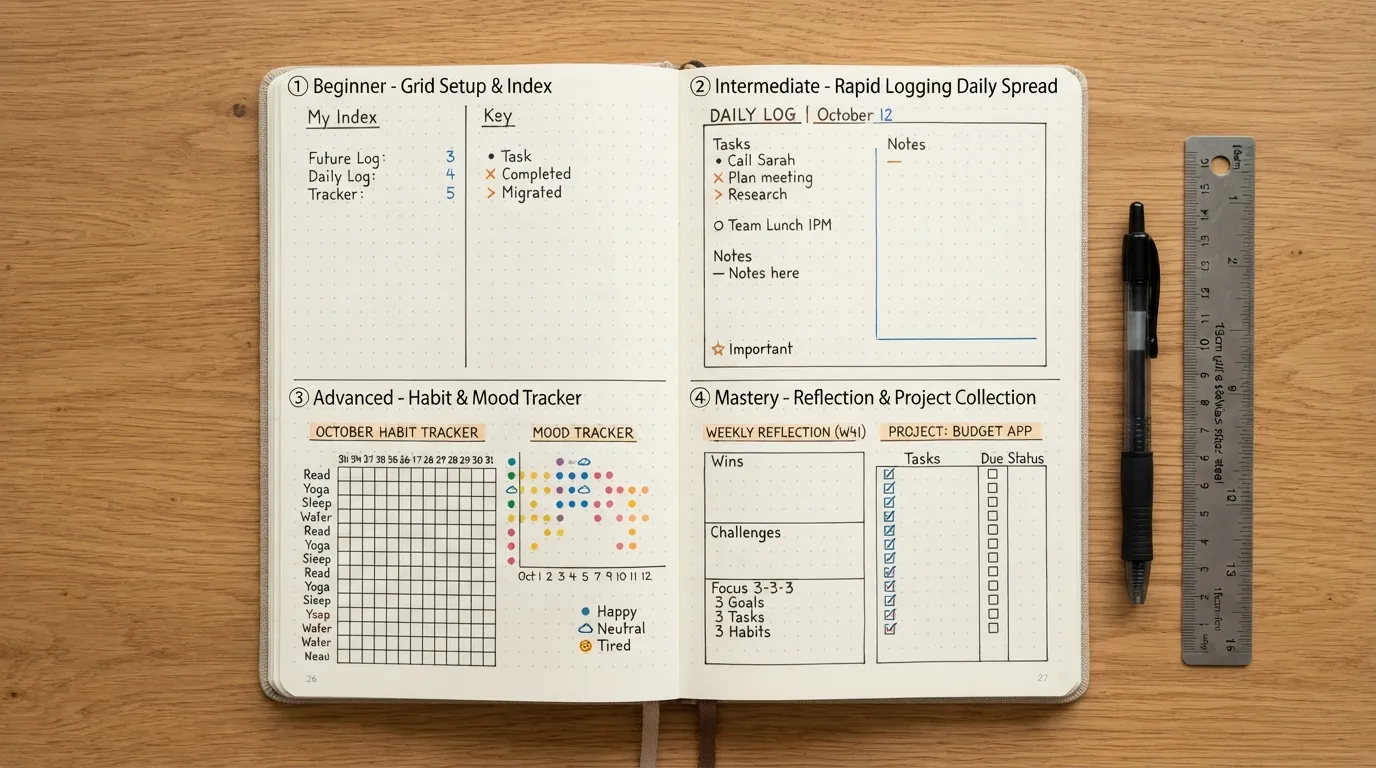
A blank notebook can feel equal parts exciting and intimidating. Lines feel too rigid, plain pages leave your writing slanting downhill, and full grid paper looks like a high school math test. That is exactly why dotted journals have taken over the journaling world.
Think of dot grid paper as the “Goldilocks” option of stationery: light, evenly spaced dots give you just enough subtle structure to draw clean straight lines and habit trackers, while remaining faint enough to fade into the background when you just want to dump your thoughts onto the page. You get complete creative freedom without the visual clutter.
Whether you bought a dotted notebook to start a Bullet Journal, lower your evening stress, or simply get your weekly schedule out of your head, this guide covers everything you need to know. From choosing your paper weight and setting up your first pages to functional layouts that support your daily mental well-being, here is how to make those dots work for you.
Quick Guide: What You’ll Learn
Why Dot Grid Journaling Works — The psychology and flexibility behind the dots.
Essentials to Get Started — Paper GSM, dot spacing, and the best pens to avoid bleed-through.
Step-by-Step Journal Setup — Setting up your Index, Key, and initial pages without perfectionism.
Core Layouts for Daily Life & Wellbeing — Habit trackers, mood logs, and weekly spreads that reduce stress.
Tips for Long-Term Consistency — How to keep writing when you lose momentum.
What Is a Dotted Journal? And How Is It Different From Lined, Blank & Squared Pages?
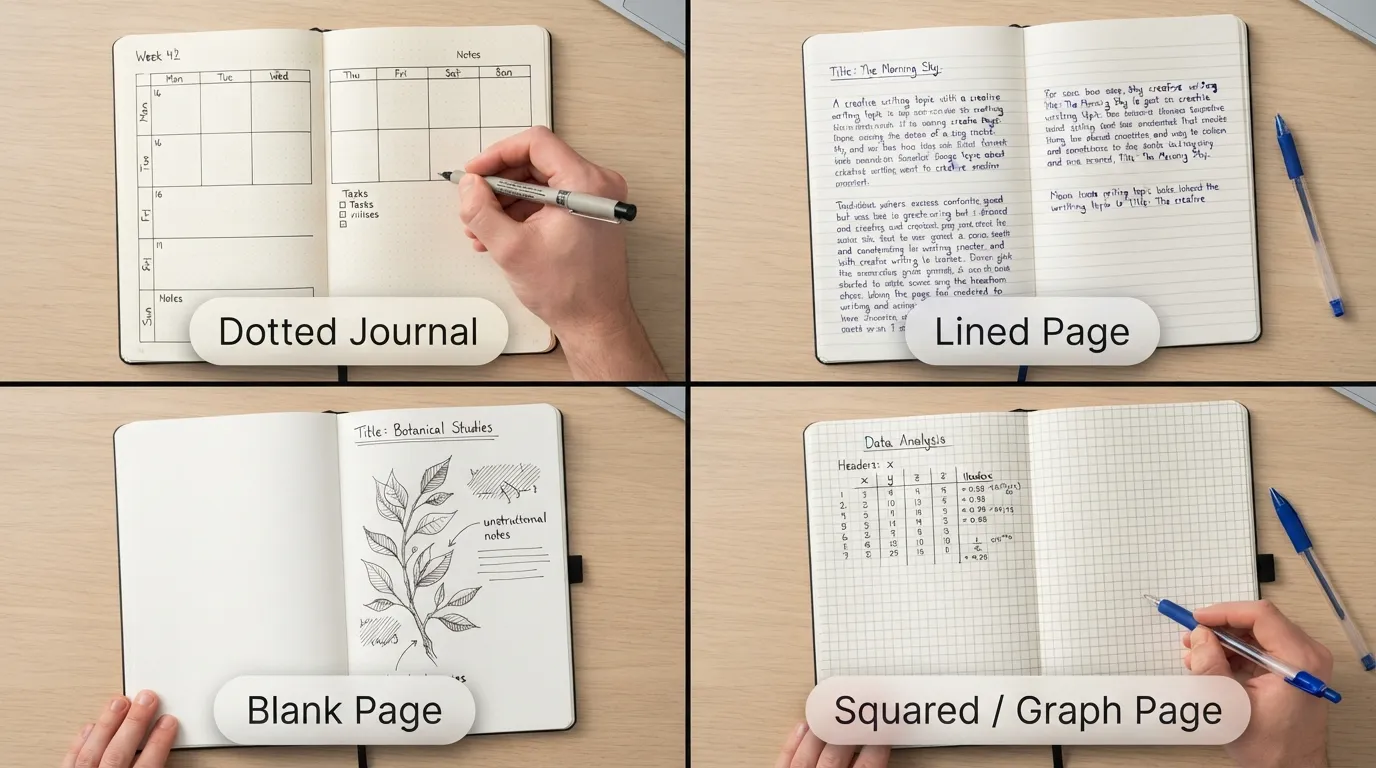
A dotted journal—often called a dot grid journal—is a notebook with pages covered in a faint grid of small, evenly spaced dots. Instead of solid horizontal lines or full graph squares, the dots act as subtle guideposts.
When you look at a dot grid page from a comfortable writing distance, the dots virtually disappear into the background. But when you look closely, they give you exact anchor points to draw straight lines, divide pages into equal columns, alignment-check your handwriting, or sketch custom tables without needing a ruler every single time.
What Makes Dot Grid Pages Unique
The true strength of a dot grid lies in its multi-functionality. Traditional page styles force you into a single way of working, but dots adapt to whatever you need on any given day.
Invisible Guidance: The grid is structured enough to guide a complex financial tracker or weekly calendar, yet light enough that a long-form diary entry looks clean and clutter-free.
Built-in Measurement: Because the spacing between dots is precise, you can count dots instead of measuring with a ruler. If you want to divide an A5 page into three equal vertical sections, you simply count the dots across and split them.
Spatial Freedom: Lined notebooks dictate how tall your handwriting should be and push you line-by-line down the page. Dots give you complete spatial freedom—you can write horizontally, vertically, construct boxed-off sections, or sketch mind maps while maintaining visual order.
Reduced Mental Strain: From a holistic well-being perspective, rigid lines can trigger perfectionism (“I messed up the line”), while completely blank pages often trigger the “blank page anxiety” of not knowing where to start. Dot grids hit the sweet spot of flexible order, making it easier to start writing and drop into a flow state.
Dotted vs Lined vs Blank vs Squared — Comparison Table
To help you decide if a dot grid fits your daily routine, here is how it compares directly to traditional page formats:
| Page Style | Key Flexibility | Best Used For | Common Downsides |
|---|---|---|---|
| Dotted Page | High — Balances structure and visual openness seamlessly. | Bullet journaling, habit tracking, combined text & sketches, custom planners. | Takes a short adjustment period if you've only ever written on lined paper. |
| Lined Page | Low — Strictly linear, pushing you line-by-line down the page. | Stream-of-consciousness journaling, long-form prose, school or meeting notes. | Terrible for drawing tables, habit trackers, diagrams, or side-by-side columns. |
| Blank Page | Maximum — No guidance or boundaries whatsoever. | Freehand sketching, mind mapping, art journaling, unconstrained brainstorming. | Text often slants downhill; creating structured layouts requires constant measuring with a ruler. |
| Squared (Graph) | Medium — Strong structural guide, but high visual noise. | Math work, engineering diagrams, technical charts, pixel art, data logging. | The dark grid lines can feel harsh and crowd long-form personal writing or light sketches. |
Standard Dot Spacing (5mm vs 7mm)
Not all dot grid journals are printed identically. The distance between each dot impacts how much you can fit on a page and how comfortable your handwriting feels.
5mm Spacing (The Industry Standard)
The vast majority of dotted notebooks—including popular brands like Leuchtturm1917, Scribbles That Matter, and Archer & Olive—use a 5mm (0.2 inch) dot grid.
Why it works: A 5mm grid is the sweet spot for productivity layouts. On a standard A5 page, a 5mm grid usually gives you 26 dots across and 38 dots down. This makes math effortless when calculating half-pages (13 dots) or splitting a spread into daily boxes.
Who it’s for: Anyone doing detailed task management, habit tracking, or people with small-to-medium handwriting.
7mm Spacing (Wide-Ruled Option)
While less common, some manufacturers offer a 7mm or “wide-ruled” dot grid.
Why it works: The extra 2mm of breathing room between dots matches standard wide-ruled notebook line spacing.
Who it’s for: Ideal if you have naturally large, sweeping handwriting, struggle with eye strain, or prefer using your dotted journal primarily for open text journaling rather than compact, detailed trackers.
Practical Tip: If you’re unsure which grid spacing to choose, start with a 5mm A5 notebook. It is the baseline standard for almost every downloadable template, stencil, and video tutorial in the journaling community.
Diary vs Journal vs Dotted Journal vs Bullet Journal — Clearing the Confusion
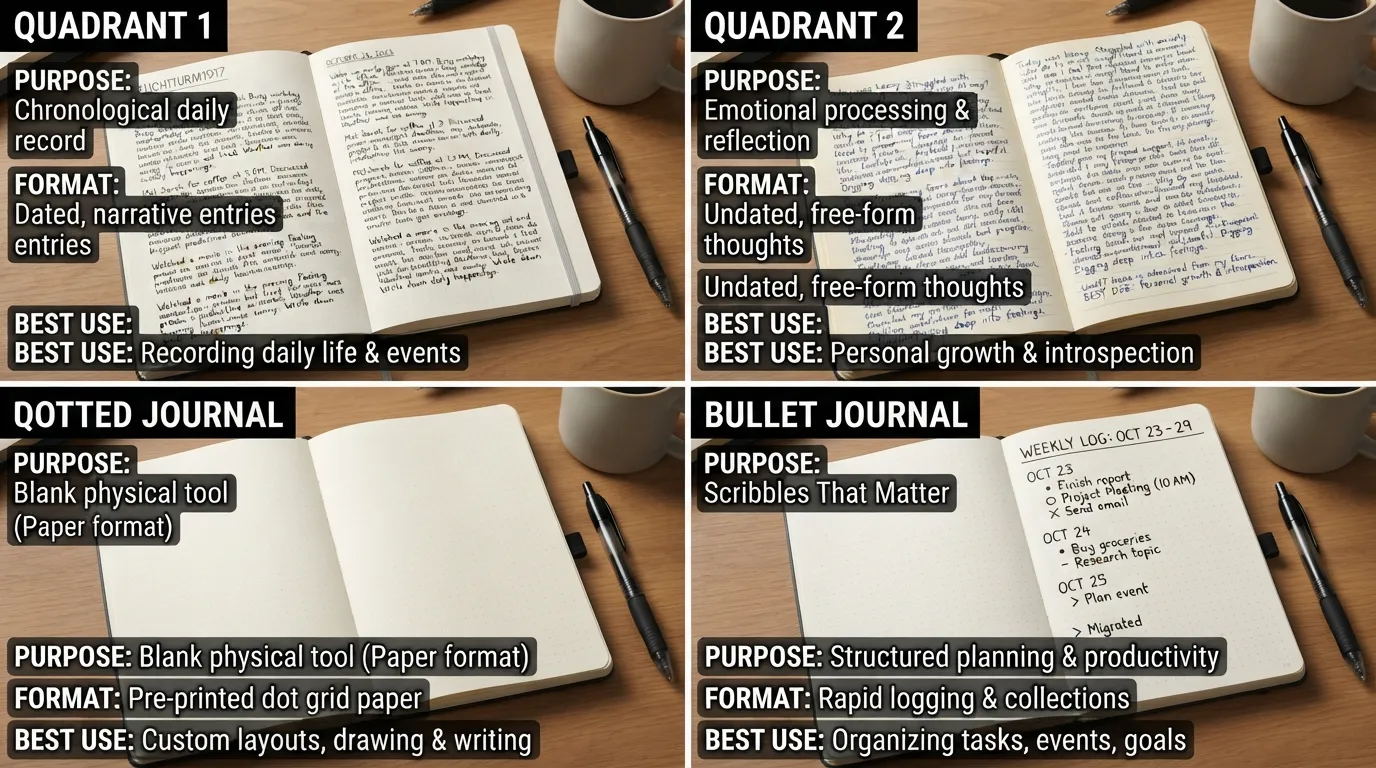
If you have ever felt confused by these four terms being thrown around interchangeably, you are not alone. While they all involve putting pen to paper, they serve distinctly different purposes in your daily routine.
Understanding the differences helps you choose the right format for your goals—whether you want to process deep emotions, manage a busy work schedule, or build a mindful daily routine.
Is a Diary the Same as a Journal?
While people often use “diary” and “journal” to mean the same thing, they traditionally differ in focus, timing, and intent.
A diary is inherently date-driven and retrospective. It is primarily used to log what happened on a specific day—the events, activities, conversations, and personal observations recorded in chronological order. Think of it as a historical record of your personal life.
A journal, on the other hand, is idea-driven and introspective. It focuses less on the exact sequence of daily events and more on how you feel, what you are processing, or what you are exploring. A journal entry might be an analysis of a recurring anxiety, a gratitude list, a set of goals, or a creative brainstorming session.
In short: A diary records your actions and events; a journal explores your thoughts, emotions, and personal growth.
Can I Use a Dotted Journal as a Diary?
Yes, absolutely. A dotted journal is simply a paper format—not a rigid set of rules. The subtle dot grid actually makes an ideal foundation for a diary because it gives you total control over how you log your days.
Unlike a traditional pre-printed diary that restricts you to a fixed box per date (often leaving too much empty space on quiet days or running out of room on busy ones), a dotted journal adapts to you. You can write a two-sentence entry on Monday, draw a full-page memory box on Tuesday, and leave Wednesday blank without wasting pages.
Quick Definitions Side-by-Side
To clear up any remaining overlap, here is how the paper tool (the notebook) compares to the writing methods:
Diary (The Method): A chronological record of daily events, activities, and personal experiences. Focuses on tracking time and life events.
Journal (The Method): A reflective practice used for self-discovery, emotional processing, mental clarity, and goal setting. Focuses on thoughts and well-being.
Dotted Journal (The Notebook): The physical tool itself—a notebook with faint dot grid paper. It provides subtle structure for both text and drawings without forcing a specific layout.
Bullet Journal / BuJo (The System): A specific, rapid-logging productivity system created by Ryder Carroll. It uses bullets, task symbols, and custom spreads (like indexes and future logs) inside a dotted notebook to track the past, organize the present, and plan for the future.
What Do You Need to Start? Supplies Checklist

One of the biggest misconceptions about starting a dotted journal is that you need an elaborate collection of pastel highlighters, expensive calligraphy pens, and custom stencils. You don’t. At its core, all you need is a notebook and a single pen that writes reliably.
Starting simple keeps the friction low so you can actually build a sustainable habit. However, picking the right paper and pen early on saves you from frustrating issues like ink bleeding through pages or ghosting.
Choosing Your Journal Size: Pocket / A5 / A4
The physical size of your notebook dictates how portable it is and how much room you have to map out your spreads.
A5 Size (5.8 x 8.3 inches): The absolute sweet spot for dotted journaling. It is large enough to fit an entire weekly schedule, habit tracker, or long-form journal entry across a two-page spread, yet compact enough to slip into a backpack or tote bag.
Pocket / A6 Size (3.5 x 5.5 inches or 4.1 x 5.8 inches): Built purely for portability. If your primary goal is rapid task logging, quick daily check-ins, or capturing ideas on the go, a pocket journal fits right in a jacket pocket or small purse. The trade-off is limited room for detailed weekly spreads or habit trackers.
A4 / B5 Size (8.3 x 11.7 inches or 6.9 x 9.8 inches): Ideal if you plan to keep your journal exclusively at your desk. B5 and A4 notebooks give you ample room for detailed project planning, artistic layouts, and multi-column tracking, but they are too bulky to comfortably carry around daily.
Paper Thickness (GSM) Explained — Which Is Best for Dotted Pages
When shopping for a dotted notebook, you will see a metric called GSM (Grams per Square Meter). GSM measures paper density and weight—the higher the number, the thicker and sturdier the pages. Choosing the right GSM prevents two common paper issues: ghosting (seeing the shadow of writing from the other side) and bleeding (ink soaking completely through the paper).
80 – 90 GSM (Standard Weight): Common in classic notebooks like Leuchtturm1917. It keeps the journal slim and lightweight, but heavy gel pens, fountain pens, or markers will ghost noticeably. Fine-point ballpoint pens work best here.
100 – 120 GSM (Mid-Weight): The ideal balance for everyday dotted journaling (found in brands like Rhodia and Scribbles That Matter). Pages feel sturdy, ghosting is minimal with standard gel pens and highlighters, and the notebook doesn’t become overly bulky.
160 GSM (Ultra-Thick Weight): Heavyweight, cardstock-like paper (found in Archer & Olive or Notebook Therapy). Pages are completely opaque with zero ghosting or bleed-through, even when using wet paint, brush pens, or watercolor washes. The downside is that these notebooks carry fewer total pages and feel considerably heavier.
Recommendation: If you want to use mild highlighters, gel pens, or light brush pens without worrying about ruined pages, aim for a 100 GSM to 120 GSM notebook.
Essential Tools
To get your journal up and running, keep these two essential items in your starter kit:
A Reliable Fine-Point Pen: A 0.38mm to 0.5mm black gel pen or fineliner (such as the Sakura Pigma Micron or Pilot G2) provides crisp, dark lines that dry quickly without smudging across the dots.
A 6-Inch (15cm) Clear Ruler: A small ruler that fits right inside your notebook cover makes drawing monthly frames, weekly boxes, and habit grids effortless. A clear plastic ruler lets you see the grid dots directly underneath while drawing.
Optional Tools
Once your daily routine is established, you can add creative or organizing tools to customize your layout:
Pencil & Eraser: Essential if you want to sketch complex layouts or line up your dot counts before committing with ink.
Mild Highlighters: Dual-ended highlighters (like Zebra Mildliners) use softer, pastel tones instead of harsh neon colors, making it easy to color-code tasks, highlight key priorities, or add gentle borders without overwhelming the page.
Washi Tape: Decorative paper tape used to create instant page borders, divide sections, mask off errors, or attach loose notes and photos into your journal.
Stencils & Stickers: Quick shortcuts for drawing consistent habit tracker icons, monthly headers, banner shapes, and checkbox symbols without needing freehand drawing skills.
Starter Kit vs. Advanced Kit
Here is a quick snapshot of how your kit can evolve depending on your budget and style:
Beginner Starter Kit:
100–120 GSM A5 Dotted Notebook
1 Black Fineliner (0.5mm) or smooth Gel Pen
6-inch Clear Ruler
1 HB Pencil + Eraser
Advanced / Creative Kit:
160 GSM A5 Dotted Notebook (for heavy ink/art)
Multi-size Fineliner set (0.1mm, 0.3mm, 0.5mm)
Set of pastel/muted Highlighters
Flexible Brush Pens for hand lettering
Washi tape rolls, stencil sets, and tab stickers
How to Set Up Your Dotted Journal — Step by Step
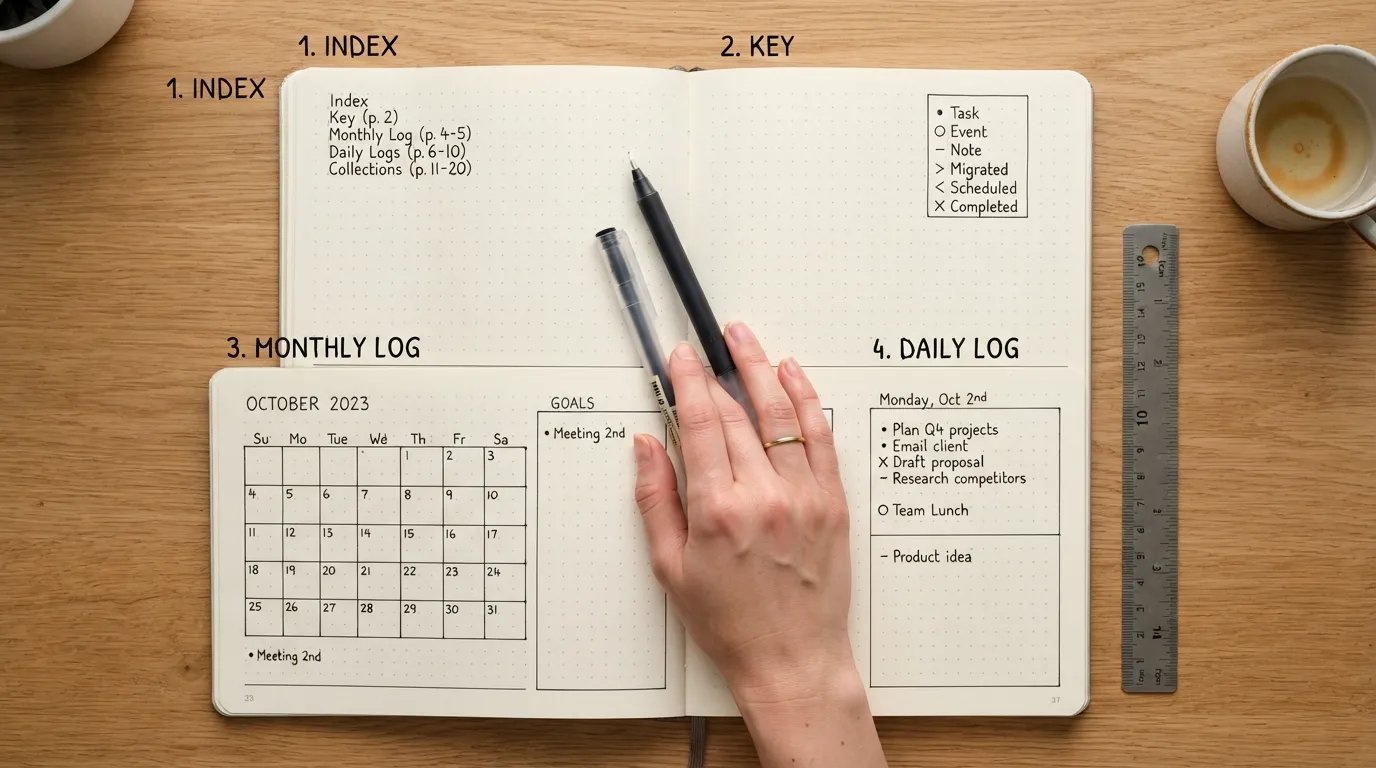
Setting up a fresh dotted journal is where function meets creativity. The beauty of a dot grid is that it does not force you into a pre-printed calendar—you build only what you need, when you need it.
Follow this step-by-step setup to establish a practical, flexible system that organizes your busy schedule while keeping daily stress low.
Step 1 — Nameplate Page
The very first page of your journal (often called the key page or cover page) serves a practical purpose: ensuring your notebook finds its way back to you if lost.
Write your name, phone number, and email address clearly.
Optional: Add a subtle incentive note, such as “If found, please contact [Phone Number]. Reward: Coffee on me!”
Keep it clean or add a small personal touch, like a minimalist quote or simple border, to signal a fresh start for your mind.
Step 2 — Create Your Index (Table of Contents)
The Index is the brain of your dotted journal. It eliminates the frustration of flipping through endless pages searching for an old meeting summary, recipe list, or project plan.
How to set it up: Reserve the first 2 to 4 pages of your notebook for your Index. Label the top of these pages “Index.”
How to use it: Divide each page into two columns: Topic/Title on the left and Page Numbers on the right.
As you fill out pages later in your notebook—whether it’s a habit tracker on page 14 or a trip itinerary on page 22—simply write the page number and title in your Index.
Pro Tip: Many modern dotted notebooks come with pre-numbered pages and a printed Index. If yours does not, dedicate 10 minutes to numbering the bottom corners of your pages with a fine pen.
Step 3 — Build a Future Log
The Future Log acts as a long-term calendar. It gives you a birds-eye view of upcoming events, birthdays, travel dates, and commitments months down the road.
Open to the next available two-page spread (pages 4 and 5).
Use your ruler to divide each page into three equal horizontal sections using the grid dots as guideposts.
Label each box with a month name (e.g., January through June on the left spread; July through December on the right spread).
Whenever you book a doctor’s appointment for next month or note a friend’s birthday in six months, write it down in the corresponding month’s box.
Step 4 — Set Up a Monthly Log
At the start of every new month, you will build a Monthly Log to organize your immediate 30-day view.
Dates Column: On the left page, list the dates of the month vertically down the left edge (1 through 30 or 31), followed by the first letter of the day of the week (e.g., 1 M, 2 T, 3 W). Use this column to schedule fixed events, appointments, and travel.
Monthly Tasks: On the right page, create a dedicated task list for high-level goals and priorities you must accomplish before the month ends.
Step 5 — Start Your Daily Log
The Daily Log is the workhorse of your dotted journal. It is where you record your day-to-day tasks, thoughts, and events as they happen.
Write today’s date as a header on the first open page.
Below the header, record your entry using short, concise entries rather than writing long prose (a technique known as Rapid Logging).
Do not pre-draw boxes for future days! Let today’s entry take as much space as it needs—whether that is three lines or a full page. When today is finished, draw a horizontal line and start tomorrow directly underneath.
Step 6 — Rapid Logging: Tasks, Events & Notes
Rapid logging is a method developed by Ryder Carroll to capture information quickly without losing momentum. Instead of writing full sentences, group your entries using three core symbols:
Tasks (
•Dot): Represent actionable items you need to complete (e.g.,• Call dentist to reschedule).Events (
OCircle): Represent time-bound occurrences, appointments, or experiences (e.g.,O Team meeting at 2 PM).Notes (
-Dash): Represent facts, ideas, observations, or thoughts you want to remember but don’t need to act on (e.g.,- Great coffee shop recommendation: Elm & Main).
Step 7 — Using Signifiers to Add Priority
Signifiers are extra symbols placed to the left of your core bullets to draw immediate attention to high-priority items or urgent context.
Star (
*): Placed next to a task dot to mark high priority or urgent items (* • Pay electricity bill today).Exclamation Point (
!): Placed next to a note to highlight an important insight, idea, or inspiration (! - Key realization: morning walks reduce afternoon fatigue).Eye Symbol (
👁orQ): Used when a task requires further research or follow-up before it can be completed.
Step 8 — Migration: Moving Tasks Forward
Migration is the secret to staying productive and maintaining a clear mind. It is the process of reviewing open tasks and deciding whether to complete them, reschedule them, or drop them entirely.
At the end of each day or month: Review all open task dots (
•).Complete (
X): Mark completed tasks with anXover the dot.Migrate Forward (
>): If a task was not completed but is still relevant, mark it with a right-facing arrow (>) and copy it forward into your next Daily Log or Monthly Log.Schedule Backward (
<): If a task needs to be pushed to a future month, mark it with a left-facing arrow (<) and move it into your Future Log.Cancel (
Sor Strikethrough): If a task is no longer worth your time or energy, cross it out cleanly. Letting go of irrelevant tasks reduces mental clutter.
Quick-Reference Key / Legend
Keep this handy legend in your journal (often drawn on the inside front cover or next to your Nameplate Page) for easy reference:
| Symbol | Meaning | Example |
|---|---|---|
| • | Task (Action Item) | • Send quarterly report |
| X | Completed Task | X Send quarterly report |
| > | Migrated Task (Moved Forward) | > Send quarterly report |
| < | Scheduled Task (Moved to Future Log) | < Book dentist checkup |
| O | Event / Appointment | O Lunch with Sarah 1 PM |
| - | Note / Observation | - Great quote from podcast |
| * | High Priority / Urgent | * • Submit taxes by Friday! |
| ! | Inspiration / Key Insight | ! - Water intake affects focus |
| ~~ | Canceled Task |
10+ Creative Ways to Use a Dotted Journal
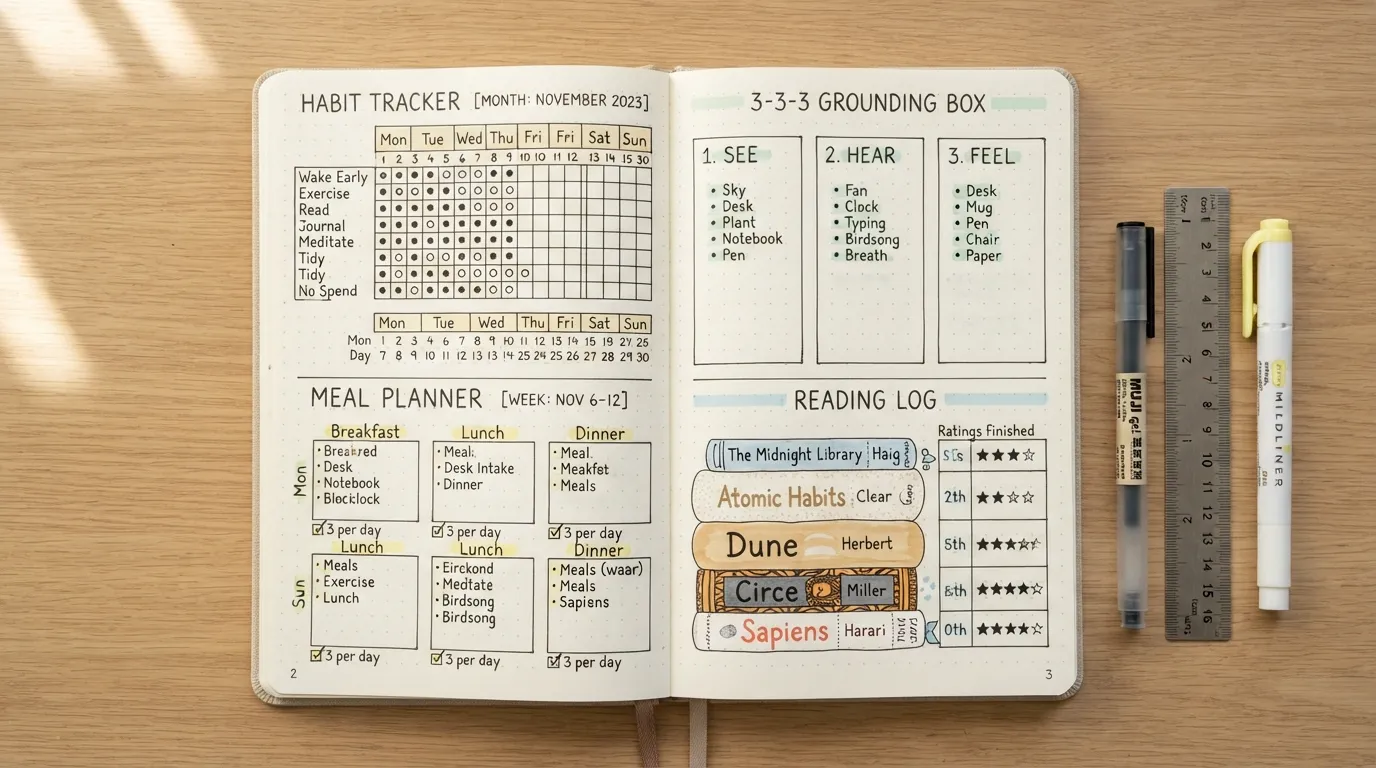
The beauty of a dot grid is that it acts like a chameleon. On one page, it is a high-efficiency productivity planner; on the next, it becomes a canvas for stress-relief sketching or financial management.
To help you get the most out of your notebook, here are over ten practical and creative ways to use a dotted journal, organized by your primary focus.
For Productivity & Planning
If your primary goal is organizing a busy schedule, dot grid pages offer unmatched precision for structured layouts.
1. Custom Weekly & Monthly Spreads: Unlike pre-printed planners that limit your text space, you can use the dots to grid out customized daily columns, weekend blocks, or 30-day overview boxes tailored to your workload.
2. Project Breakdowns & Checklists: Divide a two-page spread into distinct action phases. Use vertical dot columns to align checkboxes cleanly alongside project deliverables and deadlines.
3. Brainstorming & Flowcharts: The open grid makes it effortless to draw mind maps, decision trees, and process flowcharts. You can connect ideas with straight horizontal and vertical lines without the page looking chaotic.
For Habit & Goal Tracking
Visual tracking is one of the most effective ways to build consistency, and dots make drawing custom grids simple.
4. Habit Tracker Grids: Create a monthly matrix with your habits listed on the left vertical axis and the days of the month (1–31) across the top horizontal axis. Simply fill in a tiny dot or square every day you complete a habit (like drinking 2L of water or reading 15 minutes).
5. Mood & Energy Logs: Map out a monthly color-coded grid or wheel to track daily emotional patterns. Monitoring energy levels alongside sleep or stress helps identify subtle wellbeing triggers over time.
6. Fitness, Reading & Finance Trackers:
Fitness: Log weekly workout sets, distance, or body measurements in neat tabular rows.
Reading: Draw a bookshelf motif using the grid dots as guideposts, writing book titles on the spines as you finish them.
Finance: Build debt payoff trackers, monthly expense logs, or savings progress bars.
For Creativity
You don’t need to be an artist to enjoy creative expression on dot grid paper.
7. Freehand Sketching & Geometric Art: The faint dots give you instant perspective guides for drawing geometric patterns, architectural sketches, or floor plans without stark background grid lines cluttering your artwork.
8. Calligraphy & Hand-Lettering Practice: Use the standard 5mm dot rows as light guidelines to practice letter height, slant angle, and line spacing for brush lettering and modern calligraphy.
9. Doodling & Icon Practice: Practice drawing simple bullet journal icons, header banners, decorative dividers, and weather doodles using the dots to keep proportions symmetrical.
For Reflection & Wellbeing
Journaling is a powerful tool for grounding your nervous system and clearing mental clutter. Dotted pages give you space to process thoughts freely.
10. Daily Gratitude Log: Dedicate a page each month to list one or two things you are grateful for every day. The simple act of slowing down to fill in a line fosters a positive daily mindset.
11. Brain Dumps for Stress Relief: When feeling overwhelmed, use an open dotted spread for a unfiltered “brain dump.” Draw three large boxes: Things I Can Control, Things I Cannot Control, and Next Small Step. Sorting thoughts visually helps reduce anxiety.
12. Guided Anxiety & Reflection Prompts: Use the structured dots to write out daily reflection prompts that promote emotional processing.
3 Well-Being Prompts to Try Today:
“What is taking up the most emotional space in my mind right now, and why?”
“What is one boundary I need to set this week to protect my mental energy?”
“How does my body feel in this moment, and what does it need right now?”
The 3-3-3 and 3-2-1 Journaling Methods Explained
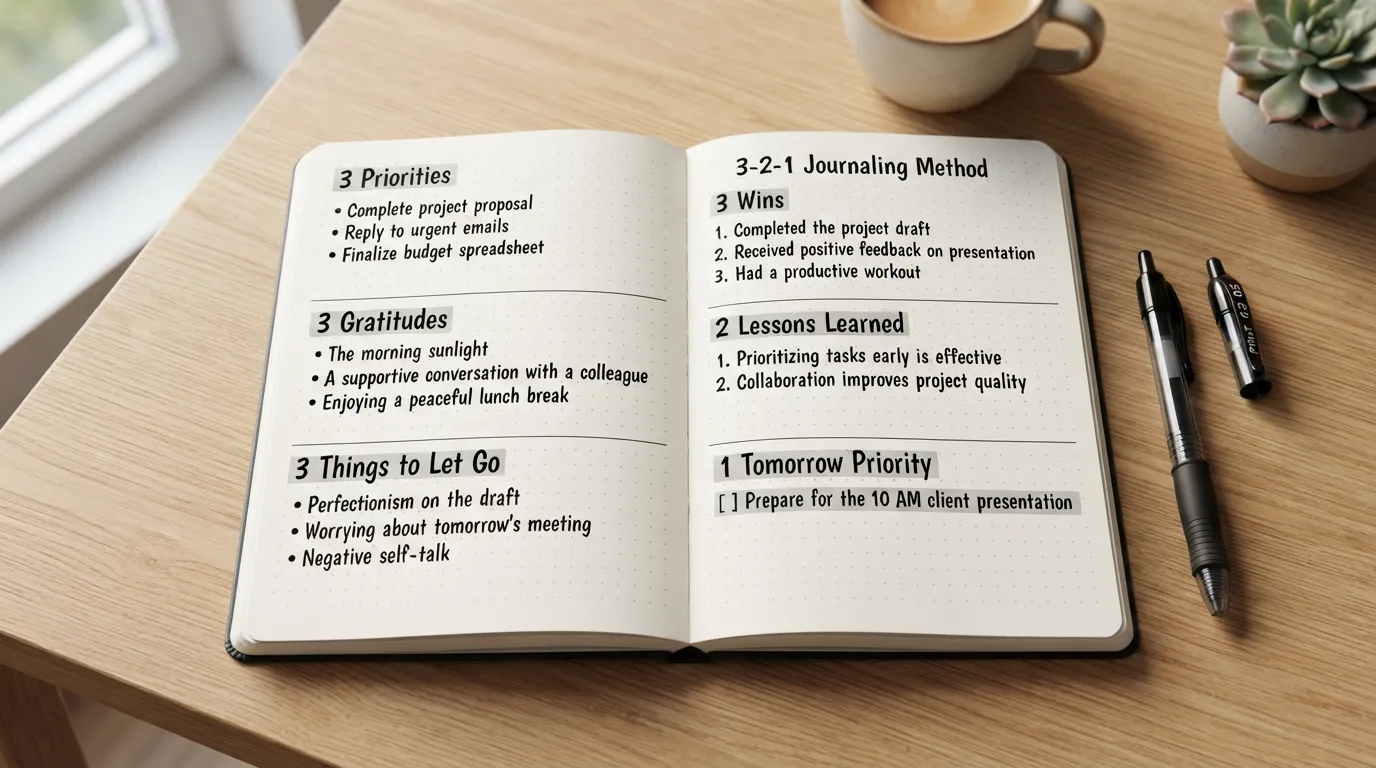
When you are feeling mentally drained or anxious, staring at an open notebook can feel like a chore. That is where structured mini-journaling frameworks shine.
Both the 3-3-3 and 3-2-1 methods give you a clear, repeatable framework to lower mental friction, focus your mind, and check in with yourself in under five minutes. The subtle dots of a grid journal make setting up these daily prompts effortless.
What Is the 3-3-3 Journaling Method?
The 3-3-3 method is a daily grounding framework designed to reduce stress, improve mental clarity, and build a balanced daily focus. It divides your entry into three equal parts, focusing on achievements, gratitude, and personal growth.
Because the layout relies on three distinct pillars, a dotted journal allows you to quickly divide a page into three clean vertical columns or stacked horizontal boxes using the dots as your guide.
How to Try the 3-3-3 Method in Your Dotted Journal Today
Draw three equal boxes on a page using your dots and answer these prompts every morning or evening:
3 Things You Want to Accomplish Today: Write down three specific, realistic priorities (e.g.,
• Submit the project draft,• Go for a 20-minute walk,• Reply to client emails).3 Things You Are Grateful For: Focus on specific, sensory details rather than broad generalities (e.g.,
- Hot coffee in the morning,- A clear phone call with my mom,- Sunshine through the window).3 Things You Want to Let Go Of: Identify three negative thoughts, stressors, or anxieties you want to release (e.g.,
- Worrying about things outside my control,- Self-doubt about my presentation,- Frustration with traffic).
What Is the 3-2-1 Journaling Method?
The 3-2-1 method is a quick reflection technique popular among entrepreneurs, athletes, and mindfulness practitioners. It is ideal for evening reviews to help transition your brain out of “work mode” and into a relaxing evening state.
It uses a descending numerical count to guide your thoughts from broad reflection down to a single, actionable takeaway for tomorrow.
How to Try the 3-2-1 Method in Your Dotted Journal Today
Set aside five minutes before bed, create four clean bullet points on your dot grid, and complete the following sequence:
3 Wins from Today: Acknowledge three things that went well, no matter how small (e.g.,
1. Finished reading a full chapter,2. Stood up from my desk every hour,3. Cooked a fresh dinner).2 Things You Learned: Record two insights, facts, or personal realizations (e.g.,
1. Taking a short afternoon break prevents an evening energy slump,2. I work faster when my phone is in another room).1 Priority for Tomorrow: Pick the single most important task or focus area for the upcoming day (e.g.,
1. Finish the first draft of the weekly newsletter before noon).
Wellbeing Tip: If you ever experience “journaling burnout,” pause your complex trackers and run either the 3-3-3 or 3-2-1 method for a week. The minimal effort required helps maintain your daily habit while restoring mental energy.
Journaling and Mental Wellbeing — What Psychologists Say

While journaling is often celebrated as a tool for personal growth, its benefits extend far beyond organizing your schedule. Decades of psychological research demonstrate that putting thoughts into written words directly influences how our brains process stress and emotional tension.
When you write on a page, you engage in a process psychologists call expressive writing. Studies published by organizations like the American Psychological Association show that translating emotional distress into written language helps lower activity in the amygdala (the brain’s emotional threat center) while engaging the prefrontal cortex, which is responsible for logic, decision-making, and emotional regulation.
Is There a Downside to Journaling?
While journaling is generally a healthy practice, psychological experts caution that it is possible to use a journal unhelpfully.
Ruminative Traps: If your entries consist solely of repeating negative thoughts over and over without exploring solutions, perspectives, or emotional release, you risk reinforcing anxiety rather than discharging it.
Over-Fixation on Perfection: Spending hours meticulously drawing complex layouts or worrying about messy handwriting can turn journaling into another source of daily pressure rather than a relaxing retreat.
Emotional Overwhelm: Forcing yourself to re-live traumatic events on paper without proper professional support can trigger emotional distress instead of healing.
Psychological Insight: To avoid rumination, end emotional entries with a reflective pivot. Ask yourself: “What can I learn from this?” or “What is one small thing within my control right now?”
What Happens If You Journal Every Day?
Consistency yields the most noticeable mental wellbeing benefits. Establishing a regular writing habit leads to measurable psychological shifts:
Reduced Cognitive Load: Writing down tasks, worries, and ideas clears space in your working memory, making it easier to concentrate and sleep.
Improved Stress Resilience: Regular expressive writing helps lower physiological stress markers, leading to lower blood pressure and better immune function over time.
Faster Pattern Recognition: Daily tracking allows you to spot emotional triggers, mood patterns, and energy slumps weeks before they turn into full-blown burnout.
Enhanced Self-Efficacy: Reviewing past entries provides tangible proof of obstacles you have successfully overcome, boosting self-confidence during challenging times.
Best Journal Type for Anxiety
When managing anxiety, the format of your journal plays a major role in how comfortable you feel opening it up.
Psychologists often recommend dotted journals for individuals dealing with anxiety because they strike an optimal balance between freedom and order:
Low Friction, High Control: Completely blank pages can trigger analysis paralysis, while rigid pre-dated planners can create guilt if you miss a day. The soft guidance of a dot grid provides a safe, customizable space without judgment.
Visual De-Cluttering: Structured layouts like mood matrices, gratitude boxes, or the 3-3-3 method allow you to externalize chaotic thoughts into clean, manageable visual structures.
Why Do People Avoid Journaling (and How to Stick With It)
Despite knowing the health benefits, many people struggle to keep up a regular journaling habit. Understanding why we resist writing is the key to overcoming it.
Perfectionism: The fear of making mistakes or ruining a nice notebook causes people to put off writing altogether.
The Fix: Intentionally mess up the very last page of your dotted journal with random scribbles or a coffee ring. Once the notebook is no longer “perfect,” the pressure evaporates.
Time Scarcity: Believing an entry must be a long, multi-page essay makes the habit feel unsustainable.
The Fix: Lower the entry bar. Commit to just two minutes, three bullet points, or one sentence per day.
Lack of Prompting: Sitting down without knowing what to write leads to frustration.
The Fix: Keep a dedicated page in your journal listing 3–4 go-to prompts (like gratitude or the 3-2-1 reflection) so you never face a blank page without a starting point.
Common Dotted Journal Mistakes and How to Fix Them
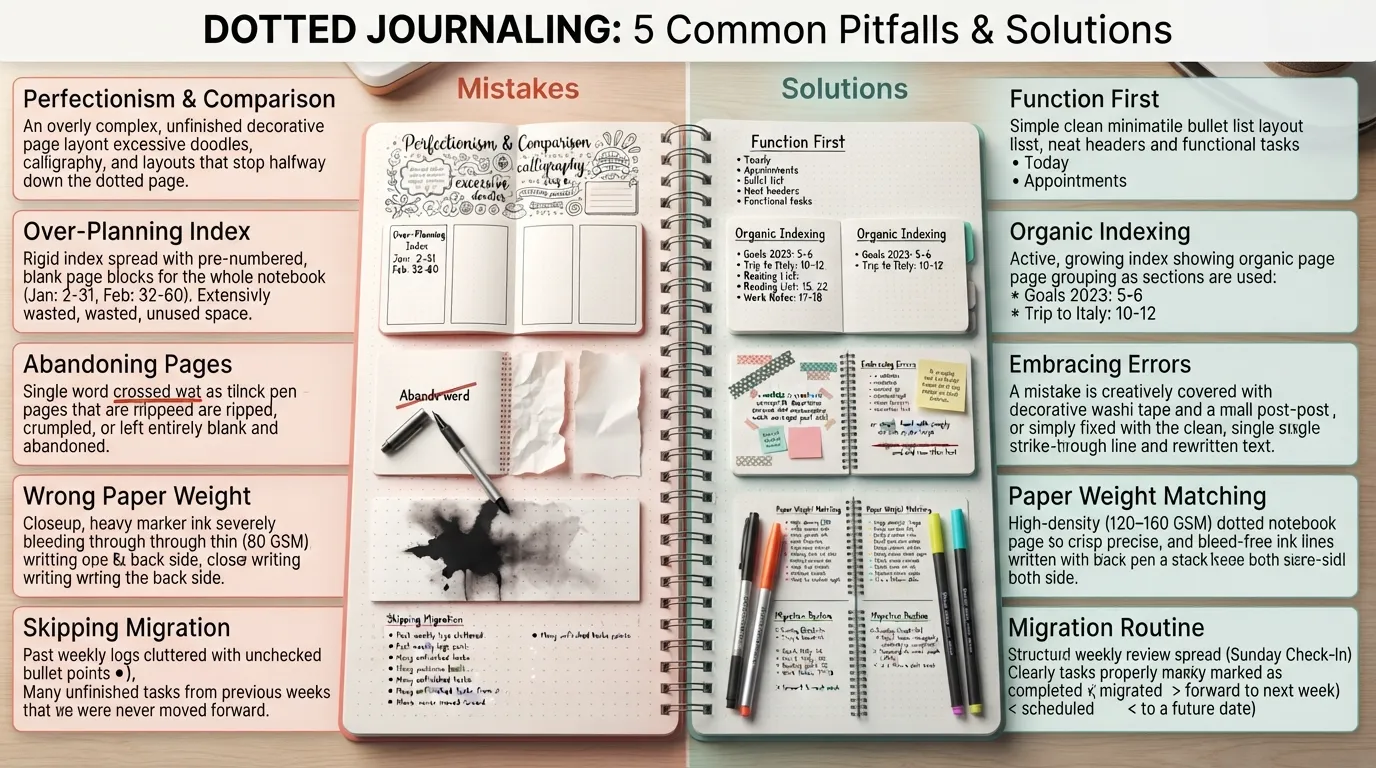
Even experienced journalers run into friction when setting up or maintaining a dot grid notebook. Most people assume that if a journal routine stops working, it is a personal failure of discipline—when in reality, it is usually just a simple setup or mindset mistake.
Recognizing these common pitfalls helps you adjust your process so your journal remains a helpful tool rather than an added chore.
1. The Perfectionism and Comparison Trap
The Mistake: Spending hours browsing pristine, hyper-artistic layouts on social media and feeling discouraged when your own pages look messy, uneven, or basic.
How to Fix It: Remind yourself that a journal is a personal tool built for function, not a gallery exhibit. If a simple bulleted list keeps your life organized and reduces your stress, it is 100% successful. Focus on how the layout serves your day, not how it looks to others.
2. Over-Planning the Index
The Mistake: Trying to pre-assign exact page blocks for the entire year in your Index before you have actually written anything, leaving you with awkward gaps or insufficient space later on.
How to Fix It: Let your journal grow organically. Log entries into your Index strictly after you create them. If a collection spans multiple non-consecutive pages (e.g., page 12 and page 45), simply list both numbers next to the topic in your Index (
Books to Read: 12, 45).
3. Abandoning the Notebook After a Mistake
The Mistake: Spilling ink, misspelling a month header, or miscounting dots for a grid, and feeling like the entire notebook is “ruined,” leading to abandoned pages.
How to Fix It: Embrace functional corrections. Use a strip of washi tape to cover a miscounted line, stick a post-it note over a misspelled title, or simply cross it out cleanly and move on. Learning to accept small errors on paper builds real-world resilience against perfectionism.
4. Choosing the Wrong Paper Weight (GSM)
The Mistake: Buying an 80 GSM notebook and using heavy gel pens, alcohol markers, or dark highlighters, resulting in severe ghosting and ink bleeding through to the next spread.
How to Fix It: Match your pen choices to your paper thickness. If you have an 80–90 GSM notebook, stick to fine-point ballpoint pens or light fineliners. If you want to use heavy ink, watercolors, or dual-brush markers, choose a notebook with 120 to 160 GSM paper.
5. Skipping the Migration Process
The Mistake: Rapidly logging dozens of tasks every day but never reviewing them, leaving uncompleted tasks scattered across past pages and causing mental anxiety.
How to Fix It: Schedule a 5-minute daily or weekly review session. Go through past entries and explicitly decide the fate of every open bullet (
•): mark completed items with anX, migrate relevant items forward (>), or cross out tasks that no longer matter. Migration keeps your mind clear and your active to-do list focused.
Video Walkthroughs: See a Dotted Journal Set Up in Real Time
Reading about grid setups and rapid logging is helpful, but seeing how pen meets paper in real time brings the entire process together.
Below are four hand-picked video walkthroughs demonstrating minimalist setups, core bullet journal foundations, and functional daily logs step-by-step.
1. How to Bullet Journal (Official System Overview)
This official tutorial by Ryder Carroll (creator of the Bullet Journal) gives you a clean overview of the rapid logging system, indexing, and future logs without any distracting clutter.
2. A Simple, Minimalist Setup for Beginners
If you feel intimidated by artistic journal layouts, this walkthrough by Matt Ragland demonstrates how to map out a fully functional weekly and monthly spread in under 20 minutes using basic fineliners.
3. Step-by-Step Dotted Journaling Basics
This beginner tutorial covers dot counting, aligning custom weekly headers, and using grid guides to split A5 pages evenly without complex measuring.
4. 60-Second Daily Log Setup & Reflection
This quick reel-style breakdown shows how fast you can outline a daily check-in spread to process thoughts, log habits, and track priorities in under two minutes.
Free Printable Dotted Journal Templates
If you are new to dot grid journaling or want to test custom layouts before committing ink to your notebook, using pre-designed printable templates is a great way to start.
To help you skip the setup friction, you can download our starter kit below, formatted specifically for standard A4 and A5 printing.
What’s Included in the Free Download
Our 1-page printable starter kit packs the essential structures you need to run a full bullet journaling setup:
- Index Spread Template: A clean two-column layout with pre-formatted rows to organize page numbers, monthly collections, and project notes.
-
Rapid Logging Key & Legend: A quick-reference cheat sheet featuring core bullet symbols (
•tasks,Xcompleted,>migrated,Oevents,-notes) and priority signifiers. - 31-Day Habit Tracker Grid: A ready-to-use horizontal grid matrix to track up to five daily health and productivity habits without needing to measure dots manually.
- Standard 5mm Dot Grid Practice Area: A section of true-to-scale 5mm dot grid paper so you can test pen bleed-through, draw sample weekly boxes, or practice hand-lettering header styles before writing in your physical journal.
How to Print and Use Templates with Your Physical Journal
- Print at 100% Scale: When printing the PDF, select "Actual Size" or "100% Scale" in your printer settings to ensure the dot grid maintains accurate 5mm spacing.
- Use as a Page Insert: Fold or cut the printed templates to slip inside your A5 journal cover as a portable reference sheet for signifiers and index logging.
- Trace Layouts: If your notebook paper is 100+ GSM, place the printed template directly underneath a blank page. The dark guidelines will shine through the dots, allowing you to trace clean monthly frames without counting dots every time.
Frequently Asked Questions
A dot journal refers to the physical notebook featuring a dot grid paper pattern. Bullet journaling (or BuJo) is the specific organizational methodology—created by Ryder Carroll—that uses rapid logging, signifiers, and index systems to track tasks, events, and notes within a notebook.
A standard beginner dotted journal typically contains 160 to 240 pages (or roughly 80 to 120 sheets). This range provides enough room to run a full year of monthly logs, weekly spreads, and custom collections without making the notebook excessively heavy or bulky to carry daily.
No, you do not need expensive or specialized pens to start. Any smooth, fine-point ballpoint pen, gel pen (0.38mm to 0.5mm), or fineliner (such as a Sakura Pigma Micron or Pilot G2) works perfectly for basic daily logging and drawing grid frames.
Yes, you can apply the bullet journaling methodology (rapid logging, indexing, and signifiers) to any lined, squared, or blank notebook. However, a dot grid notebook is preferred because the faint 5mm grid lines provide subtle structure for drawing clean boxes and matrices without cluttering the background visually.
Final Thoughts — Making the Dotted Journal Your Own
At its core, a dotted journal is a flexible canvas designed to serve your unique lifestyle, goals, and mental wellbeing. Whether you use it as a high-efficiency productivity planner, a habit tracker, or a quiet space for daily self-reflection, there is no single “right” way to fill its pages.
The true magic of the dot grid lies in its adaptability—let go of perfectionism, experiment with simple structures like the 3-3-3 method, and allow your notebook to evolve organically as a functional partner in your personal growth journey.
Pimchanok Srisuk
Pimchanok Srisuk is the Journaling Editor at Holistic Wellbeing Living. She writes about journaling prompts, reflective writing, emotional clarity, and mindful routines. With seven years of experience creating personal-growth content, Pimchanok helps readers use simple writing practices to understand their thoughts and make calmer everyday decisions.