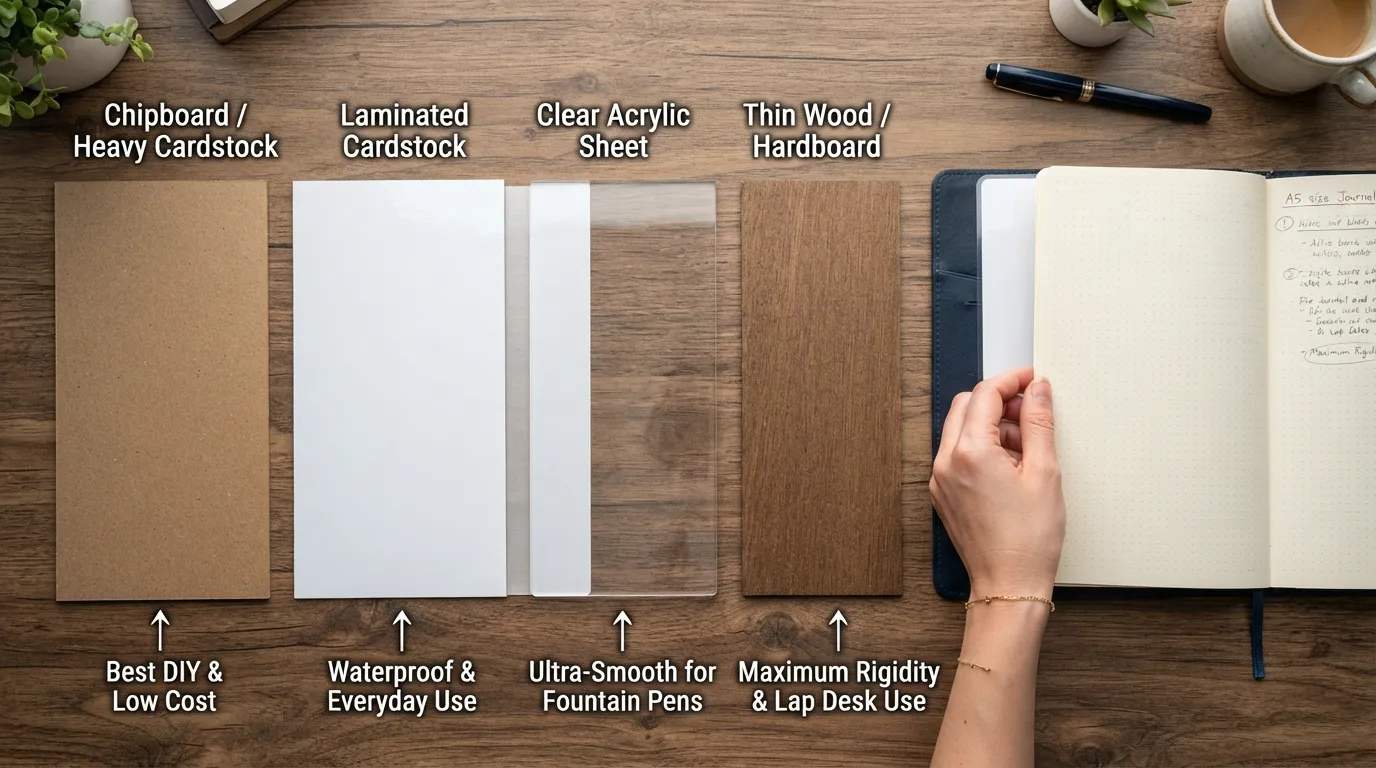
A journal backer—often called a writing board or backing board—is a firm, flat sheet you slide directly behind the page you are writing on. If you have ever dealt with ink bleeding through to the next page or struggled to write smoothly on a soft, uneven surface, a backer solves both problems instantly. It creates a sturdy, desktop-like base wherever you choose to write while keeping the rest of your notebook safe from pressure marks and ink ghosting.
What Is a Journal Backer (Writing Board)?
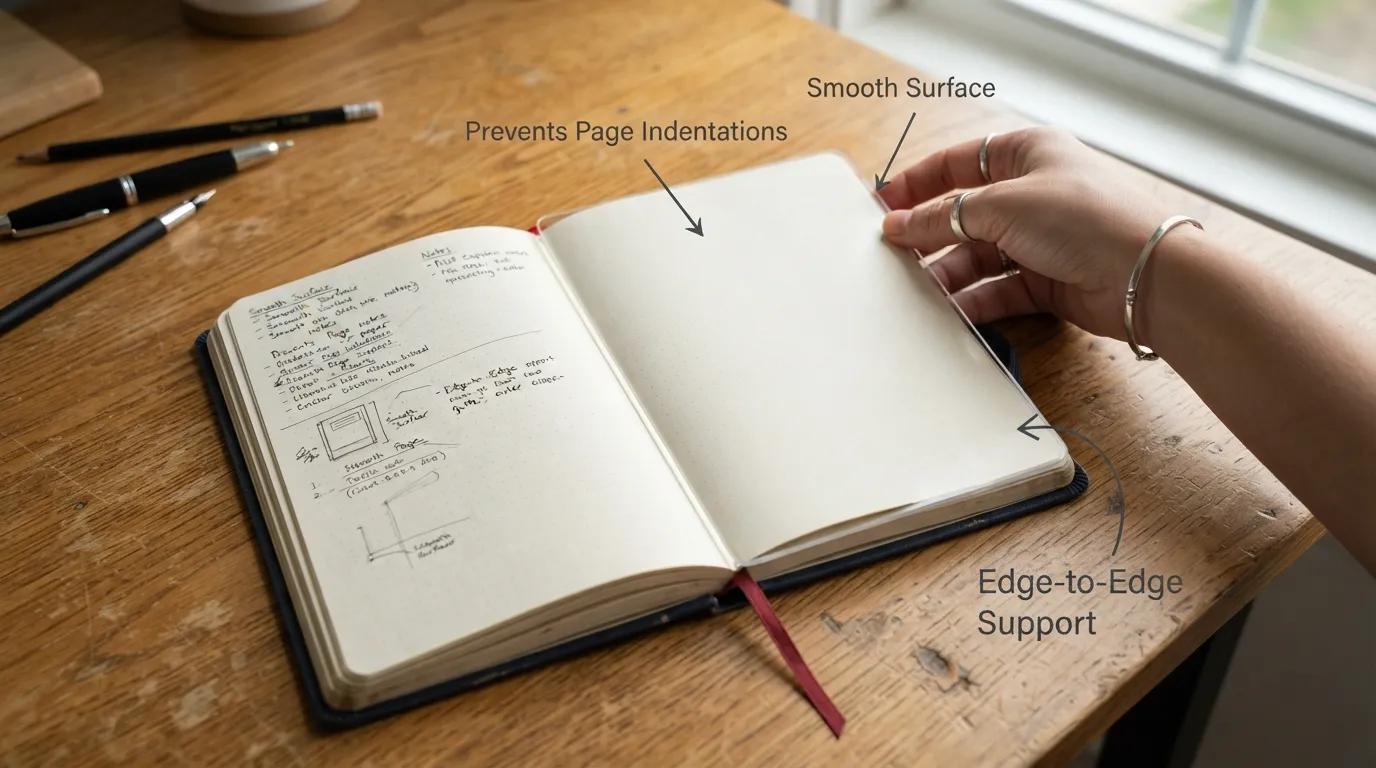
A journal backer—often called a writing board or pencil board—is a firm, flat insert you slip directly behind the page you are currently writing on to create a smooth, solid writing surface.
Physically, it is a thin, rigid sheet made of materials like thick chipboard, flexible plastic, or acrylic, usually cut to match the size of your notebook pages.
It is completely separate from the journal itself, acting as a movable tool that you slide from page to page as you fill your notebook, rather than a built-in part of the book’s binding or cover.
Why Your Journal Needs One
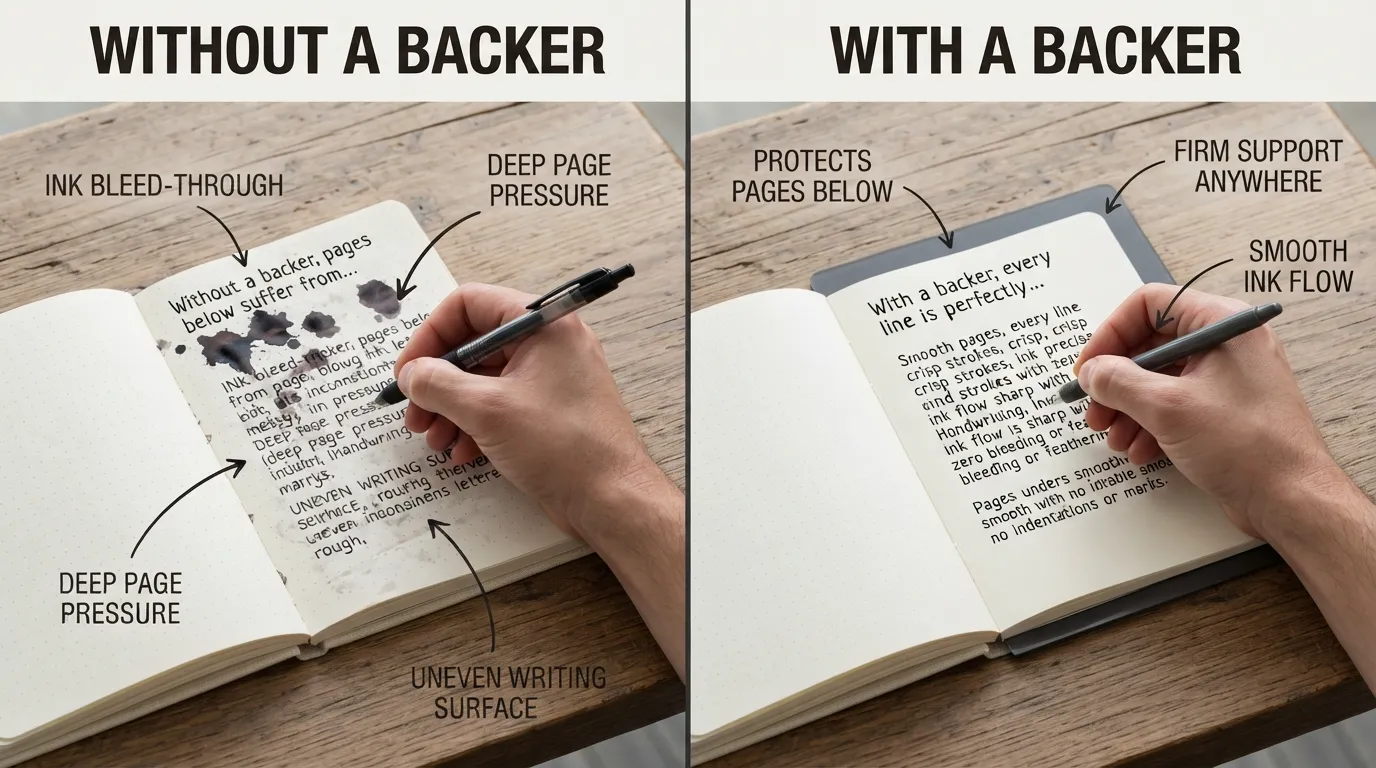
Using a solid backing behind your page changes the whole physical experience of writing. Here is why adding a board to your routine makes such a noticeable difference:
Stops ink bleed-through and ghosting: Wet inks like fountain pens, gel pens, or markers often soak through thin paper. A dense backer acts as a barrier, absorbing excess pressure and protecting the fresh page underneath from stray ink spots.
Prevents dents and page tears: Sharp pen nibs and heavy pressure leave deep grooves on the pages below. Over time, those indentations turn into small tears or create a bumpy surface that ruins your next entry.
Gives you a stable surface anywhere: You do not need a flat desk to write comfortably. Sliding a stiff board behind your page gives you a mini writing desk on your lap, in bed, on a couch, or while sitting on a train.
Keeps your handwriting straight: Soft, unsupported pages bow under your hand, causing your lines to slope downward. A firm board keeps the page flat so your writing stays neat and even from edge to edge.
Types of Backing Boards (Material Comparison)
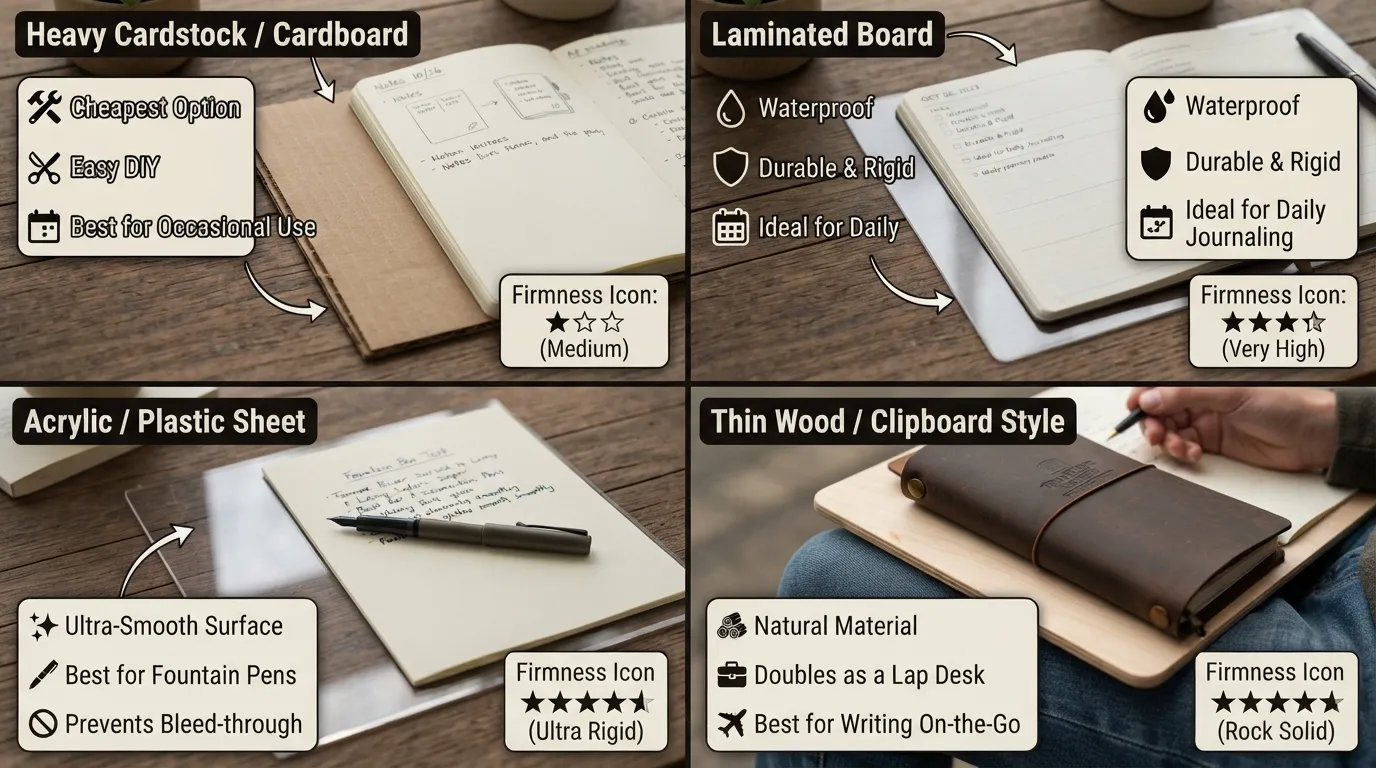
Different materials bring different levels of stiffness, weight, and durability to your journal setup. Choosing the right backing board depends on how often you write and the type of pen you prefer.
Heavy Cardstock or Cardboard — cheapest, easiest DIY, best for occasional use
Cost & Accessibility: You can easily make this at home using cereal boxes, shipping boxes, or thick cardstock scraps without spending extra money.
Ease of Crafting: It cuts smoothly with basic household scissors or a craft knife, making it simple to trim to your exact journal dimensions.
Best Use Case: Ideal for beginners or occasional writers who want a quick, zero-cost support board.
Trade-off: Cardboard bends under heavy hand pressure over time and absorbs moisture, so it will wear out faster than rigid materials.
Laminated Board — waterproof, rigid, best for daily journalers
Durability: Laminating a sheet of heavy cardstock creates a sealed, waterproof barrier that protects your journal pages from spills and moisture.
Firm Surface: It gives you a firm, flat backing that stops your pen from pressing through to the pages underneath.
Daily Portability: Lightweight and slim, it slides easily into any journal pocket without adding bulky weight to your bag.
Trade-off: If the laminate edges are trimmed too close to the paper core, moisture can leak in and lift the plastic layer over time.
Acrylic or Plastic Sheet — smoothest surface, best for fountain pen/heavy ink
Ultra-Smooth Feel: Clear acrylic or thin plastic sheets offer an completely flat surface, allowing fountain pen nibs to glide effortlessly across the page.
Ink Protection: Liquid ink and heavy markers won’t bleed through onto the acrylic board, and any stray ink wipes off cleanly with a tissue.
Long-Lasting: These sheets won’t warp, crack, or bend under normal writing pressure, making them virtually indestructible for desk use.
Trade-off: Plastic can feel cold or slippery under thin paper, and it requires a dedicated cutting tool if you need to resize it yourself.
Thin Wood or Clipboard-Style Backer — doubles as a lap desk, best for on-the-go writing
Maximum Rigidity: Thin plywood, balsa wood, or hardboard gives you a firm, unyielding surface that works anywhere, even on your lap or in bed.
Lap Desk Functionality: Larger wood backers extend beyond the edges of your notebook, giving your wrists steady support while writing on the move.
Natural Texture: Offers a classic, rustic feel that looks great alongside leather-bound or vintage notebooks.
Trade-off: Wood adds noticeable weight and thickness to your setup, making it less convenient to slip inside smaller journal covers.
How to Make Your Own Journal Backer (Step-by-Step)
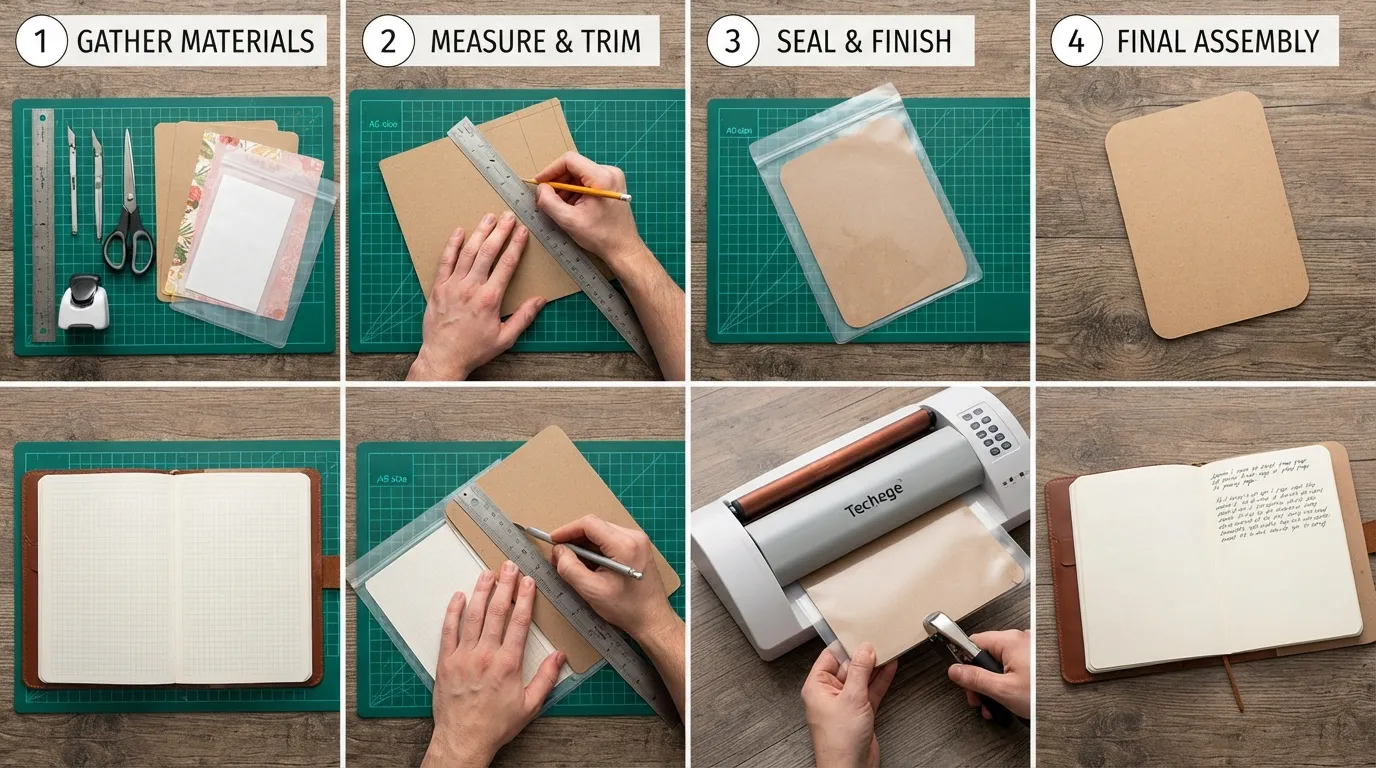
Making your own writing board takes less than fifteen minutes and requires only basic household items. Here is how to create a custom, durable board fitted specifically for your notebook.
What You Need
Base Board: Thick cardstock, chipboard, or a cereal box flap.
Protective Coating: Self-sealing laminating sheet, laminating machine, or clear packing tape.
Cutting Tools: Sharp scissors or a craft knife with a cutting mat.
Measuring Tool: A standard ruler or pencil.
Step 1: Measure your journal page
Open your journal flat and measure the exact height and width of a single page. Do not measure the outside cover, as covers are usually slightly larger than the paper inside.
Step 2: Cut backing slightly smaller than the page
Subtract a quarter-inch (about 6 mm) from both the height and the width of your page measurement. Trimming the board slightly smaller allows it to slide cleanly into the page gutter without sticking out past the paper edges.
Step 3: Round the corners
Use scissors or a corner punch to round all four corners of your cut board. Sharp square corners catch on paper edges, poke through inner pockets, and bend over time.
Step 4: Laminate or tape both sides
Seal the board to make it rigid and wipeable.
Laminating Option: Place your trimmed cardstock inside a laminating pouch and run it through a laminator, leaving a tiny plastic border around the paper core.
Packing Tape Option: Overlay strips of clear packing tape horizontally across the front and back, overlapping each strip slightly to prevent gaps.
Step 5: Test behind a page before daily use
Slide your finished backer directly beneath a blank sheet in your notebook. Run a pen across the paper to check for bumps, sticky tape seams, or uneven edges before writing a full entry.
Step 6: Store in the journal’s back pocket or clip to the cover
When you finish writing, store the backer inside your notebook’s rear back pocket. If your journal lacks a pocket, secure the board to the inside back cover using a slim binder clip or magnetic bookmark.
Backers for Disc-Bound and Spiral Journals (No Built-In Hard Cover)
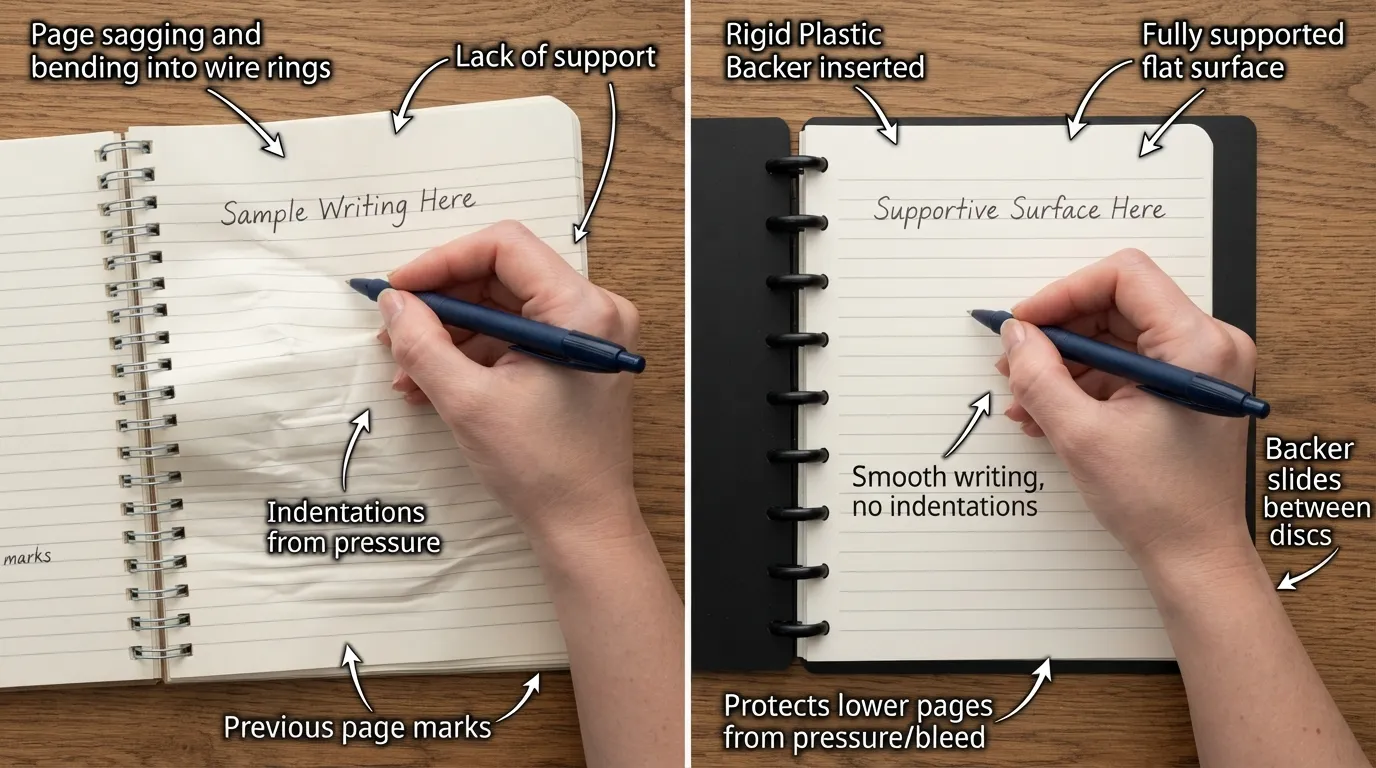
Disc-bound and spiral notebooks present unique writing challenges because they lack the rigid support of a traditional hardbound book cover. Using a backing board with these formats prevents uneven writing and page damage.
Why these formats need a backer more than book-bound journals
Lack of Cover Support: Spiral and disc-bound journals often use soft plastic or thin cardstock covers that easily bend, making writing on your lap or soft surfaces uncomfortable.
Disc and Wire Obstructions: The rings and discs lift the paper unevenly off the desk, creating a sloped writing area near the inner margins unless supported from behind.
Page Tearing Risk: Pressing down hard on unsupported, flexible pages puts extra pressure on the punched holes, increasing the risk of pages ripping out of the binding.
Ghosting and Indentations: Soft covers allow pen pressure to transfer through several pages at once, leaving deep grooves and ink marks on the sheets underneath.
Quick sizing tip for disc-bound systems
Match Page Dimensions, Not Cover Size: Trim your backing board to match the exact dimensions of your interior pages rather than the outer cover edges.
Punch Margin Clearance: Ensure the backer sits right up against the punched holes without overlapping them so it doesn’t interfere with page turning.
Use Rounded Corners: Round off the four corners of your board with a corner punch to prevent the sharp plastic or heavy cardstock edges from tearing adjacent pages.
Backers for Junk Journals
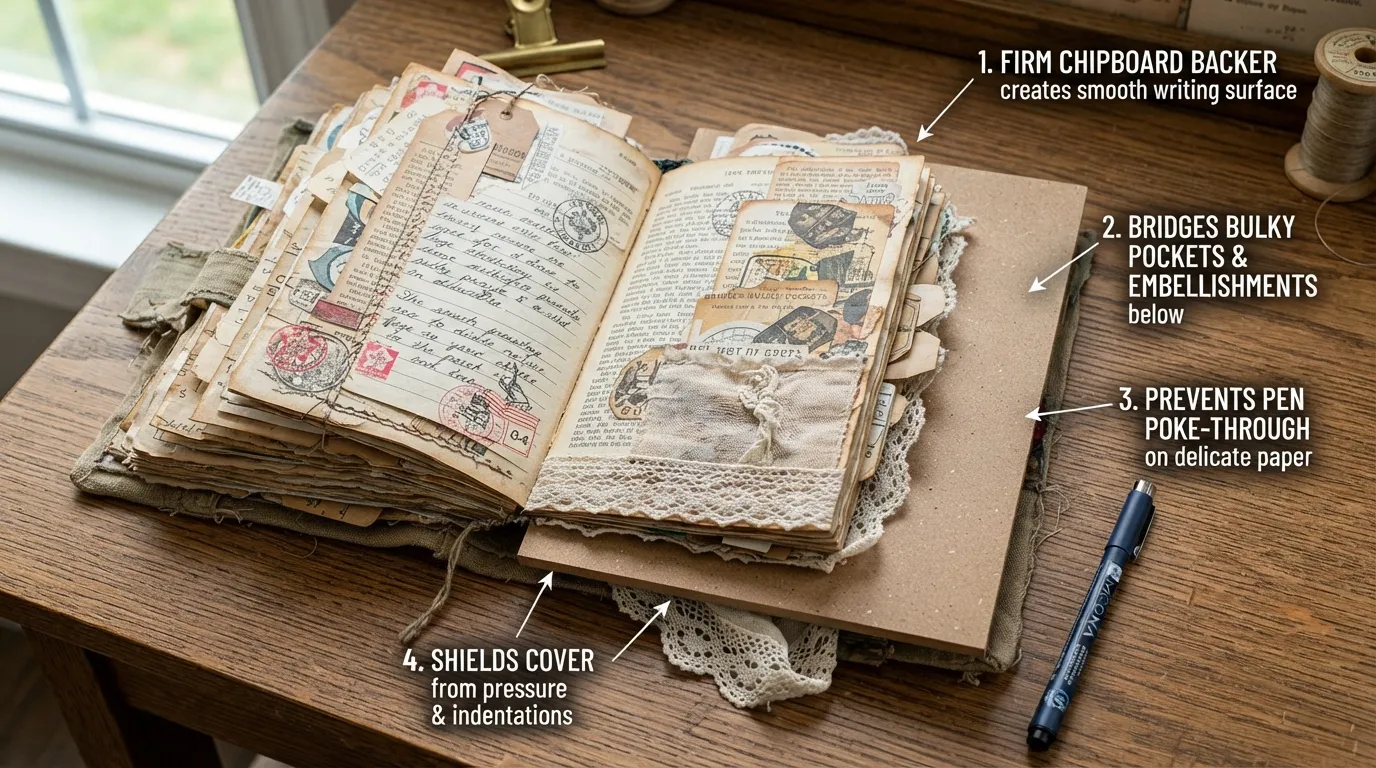
Junk journals bring unique challenges when it comes to writing smoothly. Because these journals are packed with mixed-weight ephemera, bulky tags, layered envelopes, and lace trims, the writing surface is rarely flat. A sturdy backing board slides directly behind your target page to smooth out those underlying bumps and protect delicate decorations on the previous pages.
How Mixed Elements Make a Backer Essential
Smoothing Out Raised Bumpiness: Fabric flips, tucked tags, and thick envelopes create uneven ridges under your paper. A rigid backer creates an instant flat plane so your pen doesn’t stumble or jump.
Protecting Stitched and Glued Ephemera: Heavy pressure from writing can crush delicate dried flowers, tear lace trim, or indent pop-up elements on the page directly underneath. A solid board acts as a hard shield.
Supporting Lightweight Pages: Junk journals often feature thin vintage book pages, fragile glassine bags, or light tracing paper. A backing board provides the structural support needed so your pen nib doesn’t punch straight through them.
Making Junk Journal Backers from Everyday Scraps
Cereal Box Cardboard: Cut down a clean cereal or cracker box for a quick, lightweight backer. It has just enough stiffness for light journal pages and costs nothing.
Chipboard Sheets: The heavy backing board from legal pads or packaging inserts offers maximum rigidity. It handles heavy hand pressure without flexing, making it ideal for thick, highly decorated signatures.
Old Greeting Cards: Upcycle thick holiday or birthday cards by trimming off the fold. They usually feature coated stock that resists ink bleed-through while adding a decorative touch to your journal kit.
If You'd Rather Not DIY: Ready-Made Options
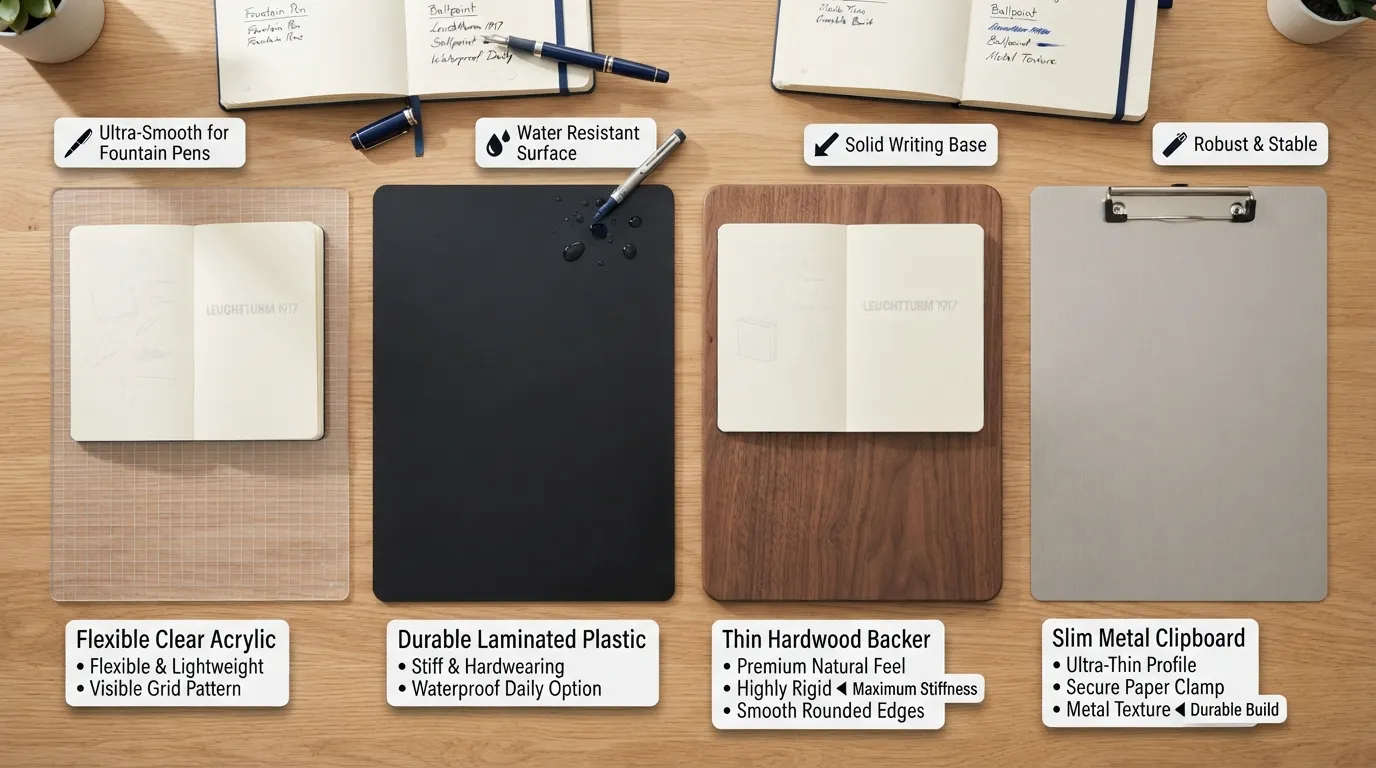
If you do not want to measure, cut, or laminate your own writing board, plenty of affordable commercial options exist. Pre-made plastic or acrylic pencil boards—often sold under Japanese stationery terms like “shitajiki”—offer an ultra-thin, perfectly smooth backing designed to fit standard notebook sizes like A5 or B6. Standard school-style plastic writing boards or thin clipboard inserts also work exceptionally well, providing an instant, durable support surface right out of the package.
Frequently Asked Questions
It should match the page size of your journal, or be just slightly smaller by about 1/8 inch on each side. A board that is too large will stick out of the notebook edges and get damaged, while a board that is too small won't support your hand near the margins.
Yes, as long as your new journal has the same or smaller page dimensions. Durable materials like acrylic, heavy laminate, or thin wood will easily outlast a single notebook, so you can simply slip the board out and move it to your next journal.
Yes, it works exceptionally well. A firm backing board prevents the paper from flexing under the nib, which gives you consistent ink flow and prevents nib snagging. For the best experience with fountain pens, use a smooth material like acrylic or laminated cardstock to avoid any texture transferring through thin paper.
Pimchanok Srisuk
Pimchanok Srisuk is the Journaling Editor at Holistic Wellbeing Living. She writes about journaling prompts, reflective writing, emotional clarity, and mindful routines. With seven years of experience creating personal-growth content, Pimchanok helps readers use simple writing practices to understand their thoughts and make calmer everyday decisions.